
About This Easter Chocolate Cupcakes Recipe
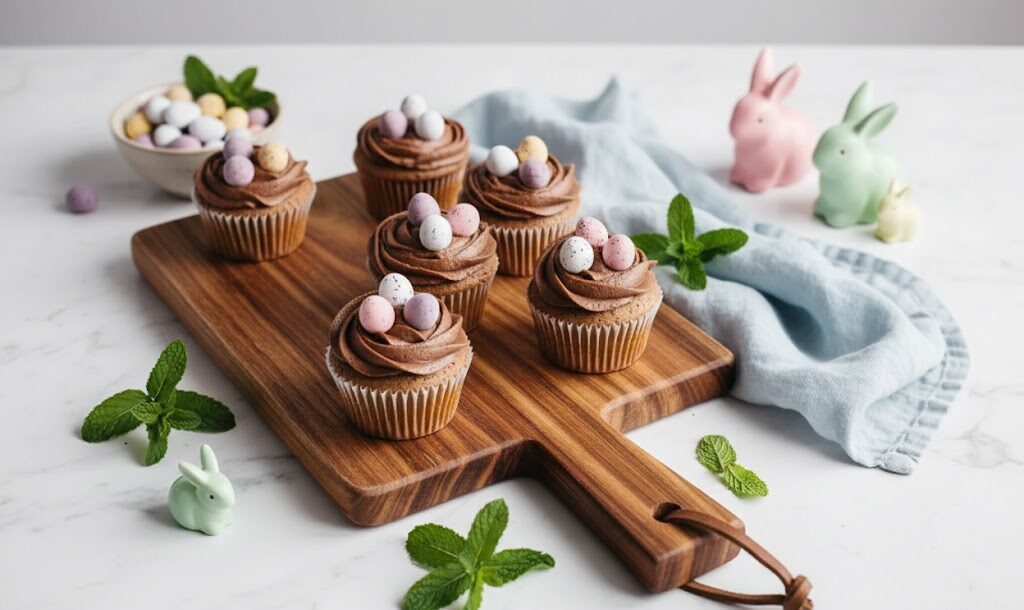
These Easter chocolate cupcakes are a delightful way to celebrate the season with something homemade, comforting, and undeniably indulgent. Soft, cocoa-rich sponge cupcakes are topped with smooth chocolate buttercream and finished with crunchy chocolate eggs that add both texture and visual appeal. They’re festive without being complicated, making them ideal for relaxed Easter gatherings, family baking sessions, or a quiet afternoon treat with a hot cup of tea or coffee.
What makes these cupcakes so appealing is their balance. The sponge is light and fluffy, yet deeply chocolatey, while the buttercream adds just the right amount of sweetness without overpowering the cake. The decorative chocolate eggs give a playful Easter touch and a satisfying crunch in every bite. Whether you’re baking for children, guests, or simply for yourself, these cupcakes feel special without requiring advanced baking skills.
This recipe is designed to be approachable and reliable. With simple pantry ingredients and straightforward steps, it’s perfect for both beginner bakers and those with more experience who want a dependable Easter bake. The cupcakes also bake evenly and hold their shape well, which makes them ideal for piping and decorating.
Why You’ll Love These Easter Cupcakes
There are plenty of reasons to come back to this recipe year after year. First, it’s quick to prepare, meaning you can have freshly baked cupcakes on the table in under an hour. Second, the flavor profile is universally loved—rich chocolate sponge paired with creamy frosting rarely disappoints. Finally, they’re versatile. While they shine as an Easter dessert, you can easily adapt them for birthdays, spring parties, or any occasion that calls for chocolate cupcakes.
Another advantage is portion control. Individual cupcakes are easier to serve than a full cake and are great for sharing. They also store well, making them a convenient make-ahead option when planning holiday menus.
Substitutions and Variations
One of the strengths of this recipe is how adaptable it is. If you enjoy experimenting in the kitchen or need to cater to specific preferences, there are plenty of variations you can try.
For a lighter Easter dessert, you could swap the cupcakes entirely for mini pavlova nests topped with whipped cream and chocolate eggs. If you’re a fan of spiced flavors, gingerbread-style cupcakes with cinnamon and warm spices make a lovely seasonal alternative. Those who love caramel notes might prefer a version inspired by biscuit-flavored spreads with a creamy topping.
For dietary needs, the recipe can be adjusted using gluten-free self-raising flour to create cupcakes suitable for special diets. The texture remains tender when baked correctly, and the chocolate flavor still comes through beautifully.
How to Store
To keep your Easter cupcakes tasting fresh, store them in an airtight container or a cake tin at room temperature. When stored properly, they remain soft and flavorful for up to three days. If your cupcakes are topped with buttercream only, there’s no need to refrigerate them. However, if you choose to fill or decorate them with fresh cream, it’s best to keep them chilled and bring them back to room temperature before serving for the best texture and flavor.
Avoid storing cupcakes in direct sunlight or warm areas, as this can cause the buttercream to soften too much and lose its shape.
Ingredients Overview
This recipe uses just 11 ingredients, many of which you may already have at home. The cupcake base relies on butter, sugar, eggs, self-raising flour, cocoa powder, and baking powder to create a soft and airy sponge. The buttercream frosting is made with butter, icing sugar, cocoa powder, and a splash of milk for smoothness. A handful of chocolate eggs completes the recipe and adds a festive finish.
Utensils You’ll Need
Before you begin, gather a few basic kitchen tools. You’ll need cupcake cases, a mixing bowl, a wooden spoon or hand mixer, and a muffin tin. A wire rack is also helpful for cooling the cupcakes evenly once baked. Having everything ready before you start makes the process smoother and more enjoyable.
Baking Tips for Even Cupcakes
For evenly baked cupcakes, make sure your oven is fully preheated before placing the tray inside. Filling each cupcake case to the same level helps them bake at the same rate. Placing the muffin tin on the middle shelf ensures even heat distribution, resulting in cupcakes that rise nicely and bake through without drying out.
Method
This recipe follows a simple, classic cupcake method that delivers consistent results every time. By mixing the ingredients carefully and baking at the right temperature, you’ll achieve cupcakes that are soft, evenly risen, and full of chocolate flavor.
Start by preheating your oven so it reaches the correct temperature before baking. This step is essential for helping the cupcakes rise properly and bake evenly. While the oven is heating, line your muffin tin with cupcake cases. This not only prevents sticking but also makes serving and storing much easier.
In a separate bowl, sift together the dry ingredients. Sifting helps remove any lumps from the cocoa powder and flour, ensuring a smooth batter and an even crumb in the finished cupcakes. Once this is done, place all the remaining cupcake ingredients into a large mixing bowl. Beat everything together until the mixture is smooth and well combined. Be careful not to overmix, as this can make the cupcakes dense instead of light and fluffy.
Spoon the batter into the prepared cupcake cases, filling each one evenly. This helps ensure all the cupcakes bake at the same rate. Transfer the tray to the middle shelf of the oven and bake until the cupcakes are risen and spring back lightly when touched. Once baked, remove them from the oven and allow them to cool completely on a wire rack before decorating.
To prepare the chocolate buttercream, beat the softened butter until smooth, then gradually add the icing sugar and cocoa powder. Finish with a small amount of milk to create a creamy, spreadable texture. Once the cupcakes are cool, spread or pipe the buttercream on top, creating a nest-like swirl. Decorate with chocolate eggs just before serving for a festive finish.
Helpful Notes for Best Results
• Always allow the cupcakes to cool fully before adding the buttercream. Warm cakes can cause the frosting to melt and lose shape.
• If your buttercream feels too thick, add a little more milk, one teaspoon at a time. If it’s too soft, add extra icing sugar.
• For neat presentation, use a piping bag with a star or round nozzle, but spreading with a knife works just as well for a more rustic look.
• Decorating just before serving keeps the chocolate eggs crisp and glossy.
Serving Suggestions
These Easter chocolate cupcakes are perfect served on their own, but they also pair beautifully with a warm drink such as tea, coffee, or hot chocolate. For a more elaborate dessert table, serve them alongside fresh fruit or lighter Easter treats to balance the richness of the chocolate.
-
Preheat the oven to 190°C (170°C fan). Line a muffin tin with cupcake cases.
-
Sift the flour, cocoa powder, and baking powder together in a bowl.
-
Place all cupcake ingredients into a large mixing bowl and beat until smooth and well combined.
-
Divide the batter evenly between the cupcake cases.
-
Bake on the middle shelf for 15–20 minutes, until the cupcakes are risen and spring back when lightly pressed.
-
Remove from the oven and allow to cool completely on a wire rack.
-
To make the buttercream, beat the butter until soft, then gradually mix in the icing sugar and cocoa powder. Add the milk and beat until smooth.
-
Spread or pipe the buttercream onto the cooled cupcakes and decorate with chocolate eggs.
Notes
- These cupcakes keep well for up to three days when stored in an airtight container at room temperature.
- If using fresh cream or alternative toppings, store the cupcakes in the refrigerator and consume within two days.
- This recipe can be adapted with gluten-free self-raising flour for those with dietary restrictions.
- Decoration can be customized with seasonal chocolates or sprinkles to suit different occasions.