
Easter Egg Shaped Sugar Cookies
There’s something about Easter that just makes baking feel extra special. Maybe it’s the pastel colors, the fresh spring vibes, or just the excuse to decorate everything with sprinkles. Either way, these Easter Egg Sugar Cookies are one of those simple, joyful treats that instantly brighten your kitchen.
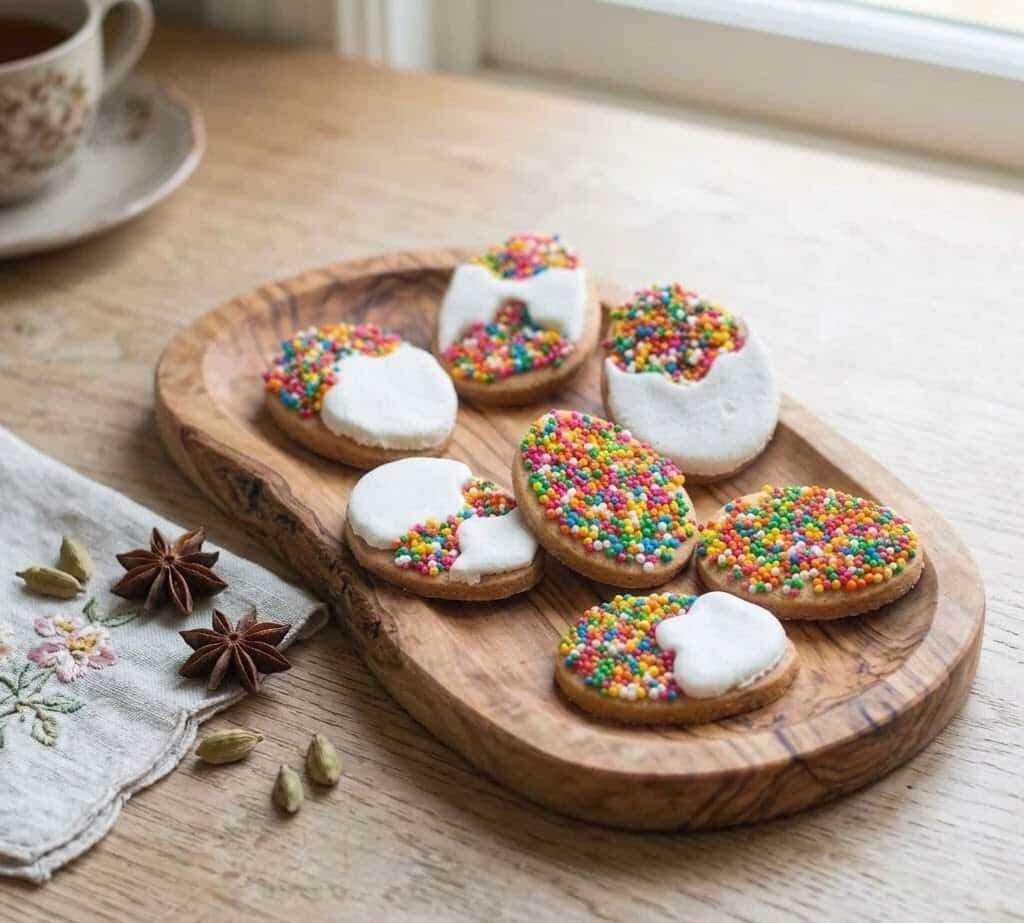
The idea is super easy: classic sugar cookies cut into egg shapes, baked until lightly golden, and then decorated with smooth white icing and colorful sprinkles. You don’t need advanced decorating skills here—honestly, the more playful and imperfect they look, the better.
These cookies have the perfect texture balance too. The edges are slightly crisp with that satisfying snap, while the inside stays soft and tender. Add a bit of sweetness from the icing and a pop of crunch from the sprinkles, and you’ve got a treat that both kids and adults will reach for again and again.
Decorating Sugar Cookies for Easter
Let’s be real—not everyone wants to spend hours piping intricate designs on cookies. And the good news? You absolutely don’t have to.
Sprinkles are your best friend here.
A simple layer of icing topped with bright, cheerful sprinkles can make your cookies look like they came straight from a bakery. You can go for stripes, dots, or just scatter them randomly—there’s no wrong way to do it.
If you’re feeling a little more creative, you can divide your icing and tint it with food coloring. Soft pastels work beautifully for Easter, but bold colors can be fun too. It’s all about your style.
The goal isn’t perfection—it’s fun. And trust me, once these cookies hit the table, no one is judging your decorating skills.
Tips for Making Royal Icing That’s Food Safe
Royal icing gives these cookies that clean, classic finish. It hardens nicely, making it perfect for decorating and stacking.
Traditionally, royal icing is made with egg whites. But since they’re not cooked, it’s important to use safe alternatives.
Here are your best options:
- Pasteurized egg whites (in a carton): The easiest and safest choice.
- Pasteurized eggs in shell: Harder to find, but they work well.
- Powdered egg whites: A great shelf-stable option.
If you’re using powdered egg whites, you’ll need to mix them with warm water before using. Typically, 2 teaspoons of powder plus 2 tablespoons of water equals one egg white—but always check your brand’s instructions.
This way, you can enjoy your cookies without worrying about food safety.
How to Get Sprinkles to Stick Without Frosting
Here’s a little trick that makes decorating even easier: you don’t always need icing to attach sprinkles.
If you want a more minimal look or just want to speed things up, try one of these methods:
1. Egg Wash
Lightly whisk a small amount of pasteurized egg white with a splash of water. Brush it onto the cookie surface, then immediately add sprinkles. They’ll stick perfectly.
2. Warmed Honey
Heat a small amount of honey for about 10–15 seconds until it becomes runny. Brush it onto the cookies and add sprinkles right away.
3. Edible Glue
You can either buy edible glue or make it at home. It works especially well if you’re doing more detailed decorating.
If you’re aiming for a neutral flavor, stick with egg wash or edible glue. Honey adds a slight taste that can sometimes overpower the cookie.
Ingredients for Easter Egg Cookies
Before you start baking, let’s take a look at what you’ll need. These are simple, everyday ingredients you probably already have in your kitchen.
For the Sugar Cookies:
- Butter (softened)
- Granulated sugar
- Egg
- Vanilla extract
- All-purpose flour
- Baking powder
- A pinch of salt
For the Royal Icing:
- Pasteurized egg whites
- Powdered sugar
- Lemon juice
And of course, don’t forget the sprinkles—they’re what make these cookies truly festive.
Directions for Easter Egg Sugar Cookies
One of the secrets to great sugar cookies is giving the dough enough time to rest. It might feel like an extra step, but it makes a big difference in both texture and flavor.
Start by creaming the butter and sugar together until the mixture becomes light and fluffy. This step is important because it helps create that soft interior.
Next, add the egg and vanilla extract. Mix everything until smooth, making sure to scrape down the sides of your bowl so everything is evenly combined.
In a separate bowl, whisk together your dry ingredients—flour, baking powder, and salt. Gradually add them to the wet mixture, mixing on low speed until a soft dough forms.
At this point, cover the dough and refrigerate it for at least 3 hours (or overnight if you have time). Chilling helps the dough firm up, making it easier to roll out and helping the cookies keep their shape while baking.
When you’re ready to bake, roll the dough out on a lightly floured surface. Aim for a thickness just over ¼ inch. Cut out egg shapes using cookie cutters and place them on a lined baking tray.
Before baking, pop the tray into the fridge for another 20–30 minutes. This extra chill step helps prevent spreading in the oven.
Bake the cookies until they’re just starting to turn golden around the edges. Let them cool completely before decorating—this part is key if you want your icing to set properly.
Royal Icing Ingredients
For a classic look, we’re going with a simple white royal icing. It pairs beautifully with colorful sprinkles and gives a clean, polished finish.
You only need three ingredients:
- Egg whites (pasteurized)
- Powdered sugar
- Lemon juice
The lemon juice not only adds a slight brightness to the flavor but also helps stabilize the icing.
Instructions for Royal Icing
Making royal icing is easier than it sounds.
Start by whisking the egg whites until they become foamy. Then, gradually add the powdered sugar, mixing continuously. As you add more sugar, the icing will thicken and turn glossy.
Once all the sugar is incorporated, add the lemon juice and continue beating until stiff peaks form. This means the icing should hold its shape when you lift the whisk.
If the icing feels too thick, you can thin it out with a teaspoon or two of water until you reach your desired consistency.
Keep the icing covered when not in use—it dries quickly when exposed to air.
Description
These Easter Egg Sugar Cookies are buttery, lightly crisp on the edges, and soft in the center—perfect for decorating with royal icing and colorful sprinkles. Whether you’re baking with family or preparing treats for a celebration, this recipe is simple, reliable, and fun.
Step 1: Make the Cookie Dough
In a large mixing bowl, beat the softened butter and sugar together until light and creamy. This should take about 2–3 minutes.
Add the egg and vanilla extract, and mix until fully combined.
In a separate bowl, whisk together the flour, baking powder, and salt. Gradually add the dry ingredients to the wet mixture, mixing on low speed until a soft dough forms.
Cover the dough and refrigerate for at least 3 hours (or overnight for best results).
Step 2: Roll and Cut the Cookies
Preheat your oven to 180°C (350°F) and line a baking tray with parchment paper.
Roll out the chilled dough on a lightly floured surface to about ¼-inch thickness. Use an egg-shaped cookie cutter to cut out your cookies.
Transfer the cutouts to the baking tray and refrigerate again for 20–30 minutes. This helps the cookies keep their shape while baking.
Step 3: Bake
Bake the cookies for 12–15 minutes, or until the edges are just lightly golden.
Allow them to cool on the baking sheet for 5 minutes, then transfer to a wire rack to cool completely before decorating.
Step 4: Make the Royal Icing
In a clean bowl, whisk the egg whites until foamy.
Gradually add the powdered sugar, mixing continuously until the icing becomes thick and glossy.
Add the lemon juice and beat for another 2–3 minutes until stiff peaks form.
If needed, add a small amount of water (1 teaspoon at a time) to adjust the consistency.
Step 5: Decorate the Cookies
Transfer the icing to a piping bag and decorate the cooled cookies as desired.
Add sprinkles immediately while the icing is still wet so they stick properly.
Alternatively, use egg wash or edible glue to attach sprinkles directly onto the cookie surface for a different design style.
Let the icing fully set before serving or storing.
Notes
Chilling is key: Don’t skip the chilling steps—they help prevent spreading and improve texture.
Use pasteurized egg whites: This keeps your icing safe to eat without cooking.
Adjust icing consistency: Thicker icing is great for outlining, while thinner icing works better for filling.
Keep icing covered: Royal icing dries quickly when exposed to air.
Flavor twist: Add a hint of almond extract or lemon zest to the dough for a subtle flavor upgrade.