
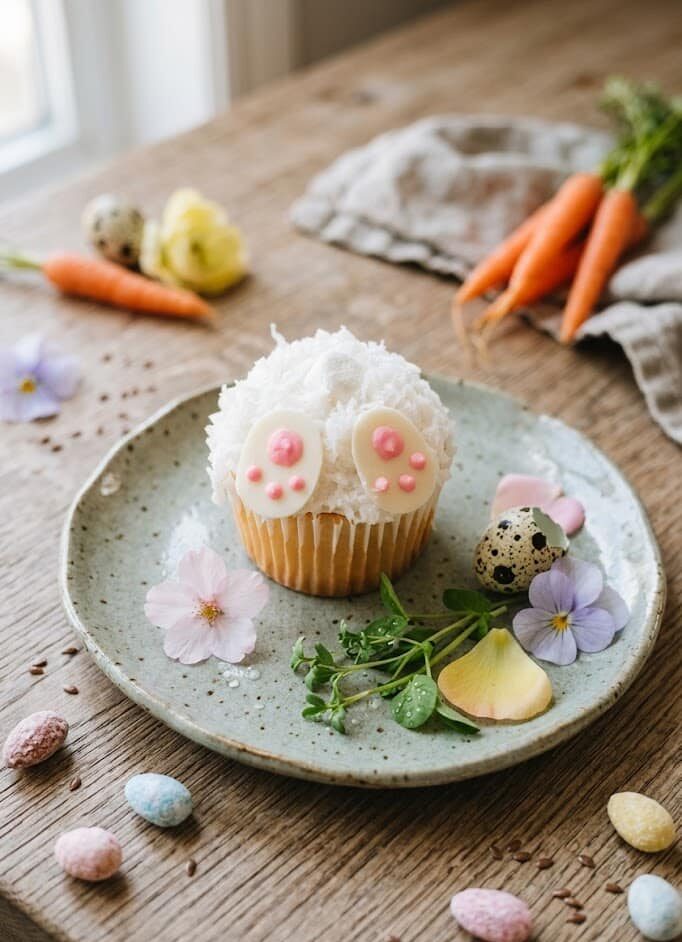
These Bunny Butt Cupcakes are the kind of treat that instantly makes people smile. Soft, fluffy cupcakes are topped with creamy frosting, coated in coconut “fur,” and finished with adorable little bunny feet and a marshmallow tail. They’re playful, festive, and honestly… almost too cute to eat (almost).
Whether you’re planning an Easter party, a spring gathering, or just want a fun baking activity with kids, this recipe is a guaranteed hit. The best part? You don’t need advanced baking skills to pull these off. With a simple cake mix and a few creative decorations, you’ll have bakery-worthy cupcakes that look like they hopped straight out of a storybook.
Save this recipe for later!
Want to keep this idea for your Easter baking list? Save it and come back when you’re ready to create something fun and memorable.
Bunny Cupcakes
There’s something special about baking seasonal treats, especially when they double as a creative activity. These Bunny Butt Cupcakes are one of those recipes that bring both fun and flavor to the table. The cupcakes themselves are soft and sweet, while the decorations add texture and personality.
What makes this recipe really stand out is how simple it is to transform basic ingredients into something eye-catching. A fluffy swirl of frosting, a sprinkle of coconut, and a few candy details are all it takes to create that adorable bunny look. It’s the kind of dessert that gets people talking—and reaching for seconds.
If you enjoy playful desserts like this, you’ll definitely want to keep this one in your rotation for spring celebrations.
Why We Love This Recipe
Adorably festive: These cupcakes are designed to look like tiny bunny tails, making them perfect for Easter celebrations.
Crowd-pleasing flavor: Light, moist cupcakes paired with sweet frosting create a dessert everyone enjoys.
Beginner-friendly: Using a boxed cake mix keeps things simple and stress-free.
Fun for kids: Decorating is the highlight—little hands will love helping with the bunny details.
Ingredients
Here’s everything you’ll need to bring these cupcakes to life:
- Cake mix (1 box): Choose your favorite flavor—carrot cake, vanilla, chocolate, or even funfetti all work well.
- Eggs: Help bind the batter and create structure.
— Oil: Adds moisture and keeps the cupcakes soft. - Water: Ensures a smooth, pourable batter.
- White frosting (about 2 containers): Used for the fluffy bunny “fur.”
- Coconut flakes: Create that realistic, fuzzy texture on top.
- Mini marshmallows: Perfect for the bunny tails.
- White candy melts: Used to shape the bunny feet.
- Pink candy melts: Add the cute paw details.
Recommended Tools
To make the process easier and cleaner, you’ll want a few basic tools:
- Piping bag (or a zip-top bag as an alternative)
- Parchment paper for shaping decorations
- Cupcake pan with liners
- Mixing bowl and hand or stand mixer
How To Make Bunny Butt Cupcakes
Step 1
In a large bowl, combine the cake mix, eggs, oil, and water. Mix until the batter is smooth and free of lumps.
Step 2
Line your cupcake pan with paper liners and fill each one about halfway with batter.
Step 3
Bake according to the instructions on your cake mix box, usually around 15–20 minutes. Check doneness with a toothpick—if it comes out clean, they’re ready. Let the cupcakes cool completely before decorating.
Step 4
Melt the white candy melts in the microwave in 30-second intervals, stirring each time until smooth. Pipe small oval shapes onto parchment paper to form bunny feet, then place them in the freezer for about 10 minutes to set.
Step 5
Melt the pink candy melts and pipe small pads onto the white chocolate ovals to create the bunny paw design. Let them harden completely before using.
How To Decorate Bunny Butt Cupcakes
Now comes the fun part—turning your baked cupcakes into adorable little bunny butts!
Step 6
Transfer your white frosting into a piping bag fitted with a star tip (like a 1M tip). Pipe a generous swirl of frosting onto each cooled cupcake, creating a fluffy base.
Step 7
Place a mini marshmallow right in the center of each cupcake to form the bunny tail. Gently press it into the frosting so it stays in place.
Step 8
Sprinkle or dip the frosted cupcakes into coconut flakes, making sure the frosting is well covered. This gives that soft, “furry” bunny look.
Step 9
Carefully press the prepared bunny feet onto the front of each cupcake. Position them with the toes pointing downward for a natural look. If needed, use a small dab of frosting to secure them.
And just like that, your Bunny Butt Cupcakes are ready to serve!
Storage Instructions
If you have leftovers (which is rare!), here’s how to keep them fresh:
- Refrigerator: Store cupcakes in an airtight container for up to 4 days.
- Freezer: Place decorated cupcakes in the freezer uncovered for about 1 hour until firm. Then wrap individually and store for up to 2 months.
Before serving, let them thaw at room temperature for the best texture.
Tips and Tricks
A few simple tricks can make a big difference:
- Cool completely before decorating: Warm cupcakes will melt your frosting.
- No piping bag? Use a zip-top bag and snip the corner—it works just as well.
- Keep decorations cool: If your kitchen is warm, store the bunny feet in the fridge until ready to use.
- Adjust coconut texture: If flakes are too large, pulse them briefly in a food processor.
- Extra fluffy tails: Roll marshmallows in a little frosting, then coat with coconut for a fuller look.
Variations and Add-Ins
Want to customize your cupcakes? Try these ideas:
- Switch the flavor: Strawberry, chocolate, lemon, or vanilla cake all work beautifully.
- Change the frosting: Use buttercream, cream cheese frosting, or even flavored frosting like strawberry or coconut.
- Color the coconut: Add a drop of food coloring to create pastel shades for a fun twist.
- Add candy eggs: Place mini candy eggs around the bunny for a cute Easter scene.
- Edible glitter: A light sprinkle adds a magical touch.
- Gluten-free option: Simply use a gluten-free cake mix.
FAQs
Can I make these cupcakes ahead of time?
Yes! You can bake the cupcakes a day in advance and decorate them the next day for best freshness.
Why isn’t my coconut sticking?
Make sure your frosting is fresh and soft. Press the coconut gently into the frosting so it adheres properly.
Can I use homemade cake batter?
Absolutely. If you prefer baking from scratch, your favorite cupcake recipe will work perfectly.
Can I skip the coconut?
Yes, but it won’t have the same “furry” bunny effect. You could replace it with extra piped frosting for texture.
- In a large bowl, mix cake mix, eggs, oil, and water until smooth.
- Line a cupcake pan with liners and fill each halfway with batter.
- Bake according to package instructions (about 15–20 minutes). Let cool completely.
- Melt white candy melts in the microwave, stirring every 30 seconds until smooth. Pipe oval shapes onto parchment paper and freeze for 10 minutes.
- Melt pink candy melts and pipe small pads onto the white ovals to create bunny feet. Let set.
- Frost each cupcake with white frosting using a piping bag.
- Add a mini marshmallow in the center of each cupcake.
- Cover frosting with coconut flakes.
- Attach bunny feet using a small amount of frosting if needed. Serve and enjoy!
Notes
- Always follow the ingredient quantities listed on your cake mix box if they differ.
- Baking time may vary depending on the brand of cake mix used.
- If decorations aren’t sticking well, use extra frosting as “glue.”
- Store decorations in a cool place to prevent melting.