
Making sauerkraut at home is one of those kitchen skills that looks intimidating at first but turns out to be surprisingly simple. With just cabbage, salt, and time, you can transform a humble vegetable into a tangy, crunchy fermented food that’s rich in flavor and tradition. Once you experience the taste and texture of homemade sauerkraut, it’s hard to go back to the store-bought version.
This method is approachable even for complete beginners. You don’t need special equipment, complicated techniques, or prior fermentation experience. All you need is patience and a willingness to let nature do its work.
Fermenting cabbage is a practice that has been passed down through generations across Europe and beyond. Long before refrigeration existed, people relied on fermentation to preserve vegetables through the winter months. What they may not have known at the time is that this process also creates a food that supports digestion and overall wellness.
If you’re curious about fermentation, sauerkraut is the perfect place to begin.
Why Make Sauerkraut at Home?
Homemade sauerkraut offers benefits that go far beyond convenience or cost. While many commercial versions are pasteurized for shelf stability, that process destroys the naturally occurring beneficial bacteria created during fermentation.
When cabbage ferments slowly in salt and its own juices, it develops a complex community of beneficial microorganisms. These naturally occurring bacteria support digestion, help maintain a balanced gut environment, and contribute to overall health.
In addition to beneficial bacteria, homemade sauerkraut contains:
- Naturally preserved vitamin C and vitamin K
- Fiber that supports digestive health
- Minerals retained through the fermentation process
- A fresh, vibrant flavor and crisp texture
The taste is another major reason people choose to make their own. Homemade sauerkraut has a clean, pleasantly sour flavor with a satisfying crunch. It can be mild or deeply tangy depending on how long you ferment it, giving you complete control over the final result.
Basic Equipment You’ll Need
One of the best things about making sauerkraut is how little equipment it requires. For centuries, people fermented cabbage with nothing more than a container and their hands.
Essential items include:
- A large glass jar or ceramic crock
- A sturdy utensil or tamper for pressing cabbage
- A weight to keep cabbage submerged
- Fresh green cabbage
- Non-iodized salt such as sea salt or kosher salt
Optional tools that can make the process easier:
- Fermentation weights designed for jars
- Airlock lids that release gas automatically
- A wooden or stainless steel pounder
If you’re just starting out, don’t worry about specialized tools. A clean jar and a bit of creativity work just fine.
How Long Homemade Sauerkraut Lasts
Properly fermented and stored sauerkraut can last for several months. Once fermentation reaches the flavor you enjoy, transferring the jar to a cold environment slows the process and preserves the cabbage.
Refrigeration is the easiest option for most people. Stored cold and kept under its brine, sauerkraut remains safe to eat and continues to develop flavor gradually over time. The key is ensuring the cabbage always stays submerged in liquid.
Freezing and Cooking Sauerkraut
Sauerkraut can be frozen or cooked, but both methods affect its live cultures. Freezing and heating destroy the beneficial bacteria created during fermentation. While the fiber and nutrients remain, the live cultures do not survive.
If your goal is digestive support, enjoy sauerkraut raw. If you’re using it in hot dishes like stews, casseroles, or sautéed meals, cooking is perfectly fine and still adds flavor and texture.
Understanding Fermentation Time
Fermentation time has a big impact on flavor and texture. Temperature and personal preference both play a role.
- Short fermentation (4–5 days): mild, lightly tangy, very crunchy
- Medium fermentation (2–3 weeks): balanced acidity, classic sauerkraut flavor
- Long fermentation (several months): stronger sourness, softer texture
Cooler temperatures encourage a slower, more complex fermentation, while warmer environments speed up the process and create sharper flavors. Tasting as it ferments is the best way to decide when it’s ready.
Is It Possible to Make Sauerkraut Without Salt?
Although salt-free fermentation is possible, it’s not recommended for beginners. Salt plays several essential roles in safe and successful fermentation:
- Draws moisture from cabbage to create brine
- Encourages beneficial bacteria to grow
- Prevents harmful microorganisms
- Preserves nutrients
- Maintains a crisp texture
The ideal salt ratio is about 2 to 3 percent of the cabbage’s weight. This creates the right balance for safe fermentation and good flavor.
Step 1: Preparing the Cabbage
Start by removing any damaged outer leaves from the cabbage. Set aside one clean outer leaf to use later as a natural cover.
Cut the cabbage in half and remove the core. Slice the cabbage thinly, aiming for even shreds. Thin slices ferment more evenly and create a better texture.
Place the shredded cabbage into a large bowl and sprinkle it evenly with salt. Massage and mix the cabbage thoroughly. After about 15 to 20 minutes, it will begin to soften and release liquid.
Using your hands or a tamper, press and pound the cabbage until enough liquid is released to form a natural brine. This liquid is essential for successful fermentation.
Step 2: Packing the Cabbage into the Jar
Once the cabbage has softened and released plenty of liquid, it’s time to transfer it into your fermentation container. Cleanliness matters here, so make sure your jar or crock is thoroughly washed.
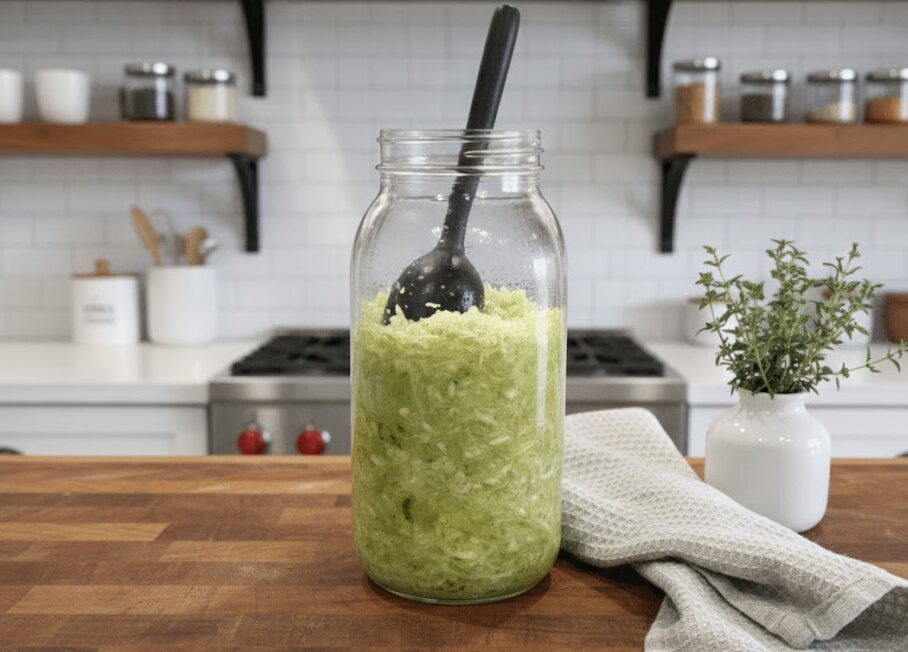
Add the cabbage to the jar a handful at a time. After each addition, press it down firmly using a tamper, the back of a spoon, or your fist. This step is important because it removes trapped air and forces the liquid to rise above the cabbage.
Continue packing and pressing until the jar is about two-thirds full. This headspace allows room for bubbling and expansion during fermentation. By the end, the cabbage should be completely submerged in its own brine.
If there isn’t enough liquid to fully cover the cabbage, don’t panic. You can prepare a simple brine by dissolving one teaspoon of non-iodized salt in one cup of water and adding just enough to cover the cabbage.
Place the reserved outer cabbage leaf on top of the shredded cabbage. This acts as a natural barrier and helps keep small pieces from floating to the surface.
Step 3: Weighting and Sealing
Keeping the cabbage submerged is the most important rule of fermentation. Exposure to air can lead to spoilage, while a submerged environment allows beneficial bacteria to thrive.
To keep everything below the brine, you can:
- Use a glass or ceramic fermentation weight
- Place a small, clean jar filled with water inside the main jar
- Gently press the cabbage down daily if using a narrow jar
Cover the jar with a lid, but do not tighten it fully. Fermentation produces gases that need to escape. If you have an airlock lid, install it according to the instructions. Otherwise, a loosely fitted lid works just fine.
Step 4: Letting the Cabbage Ferment
Place the jar in a dark, room-temperature location, ideally between 65 and 70°F (18–21°C). A cupboard, pantry, or shaded corner of the kitchen works well.
Within a few days, you should notice bubbles rising and possibly some foam forming at the top. This is a sign that fermentation is active and progressing normally. The cabbage will gradually change color from bright green to a softer, pale yellow.
After about four days, begin tasting the sauerkraut. Use a clean utensil each time to avoid introducing unwanted bacteria. Continue fermenting until the flavor matches your preference, anywhere from one week to several weeks.
How to Store Finished Sauerkraut
Once the sauerkraut tastes the way you like, it’s time to slow the fermentation process. Tighten the lid and move the jar to the refrigerator or another cold storage area between 38 and 50°F (3–10°C).
Cold storage significantly slows fermentation but doesn’t stop it entirely. The flavor will continue to evolve gradually. As long as the cabbage remains submerged in brine, it will keep for many months.
Always use clean utensils when removing sauerkraut from the jar, and press the remaining cabbage back under the liquid afterward.
Common Sauerkraut Questions
How can you tell if sauerkraut has spoiled?
Healthy sauerkraut smells pleasantly sour and fresh. If you notice a rotten odor, slimy texture, or bright colors such as pink, orange, or black, discard it. A small amount of white film or surface yeast is common and can simply be removed.
What if the sauerkraut tastes too salty?
Rinse it briefly under cold water before eating. This reduces saltiness without removing the fermented flavor.
Can you add other ingredients?
Yes. Sauerkraut is very versatile. Common additions include garlic, caraway seeds, juniper berries, ginger, or shredded carrots. Add these during the initial mixing stage so they ferment evenly with the cabbage.
Description
This simple fermented cabbage recipe uses only two ingredients and a traditional method to create a tangy, crunchy food that stores well and develops flavor over time. Perfect for beginners and experienced fermenters alike.
- Remove damaged outer leaves from the cabbage and set one clean leaf aside.
- Cut the cabbage in half, remove the core, and slice thinly.
- Place shredded cabbage in a large bowl and sprinkle evenly with salt.
- Mix and massage the cabbage until it begins releasing liquid. Let rest 15–20 minutes.
- Pound or press the cabbage until enough brine forms.
- Transfer cabbage and liquid into a clean jar, pressing firmly after each addition.
- Fill the jar no more than two-thirds full and ensure cabbage is fully submerged.
- Place the reserved cabbage leaf on top and add a weight.
- Cover loosely with a lid and store at room temperature away from light.
- Begin tasting after 4 days and ferment until desired flavor is reached.
- Seal tightly and refrigerate to slow fermentation.
Notes
- Always keep cabbage submerged under brine to prevent spoilage.
- Cooler fermentation temperatures produce a milder, more complex flavor.
- Use clean utensils when handling finished sauerkraut.
- Flavor additions should be mixed in before packing the jar.
- Raw sauerkraut retains live cultures; heating or freezing removes them.