
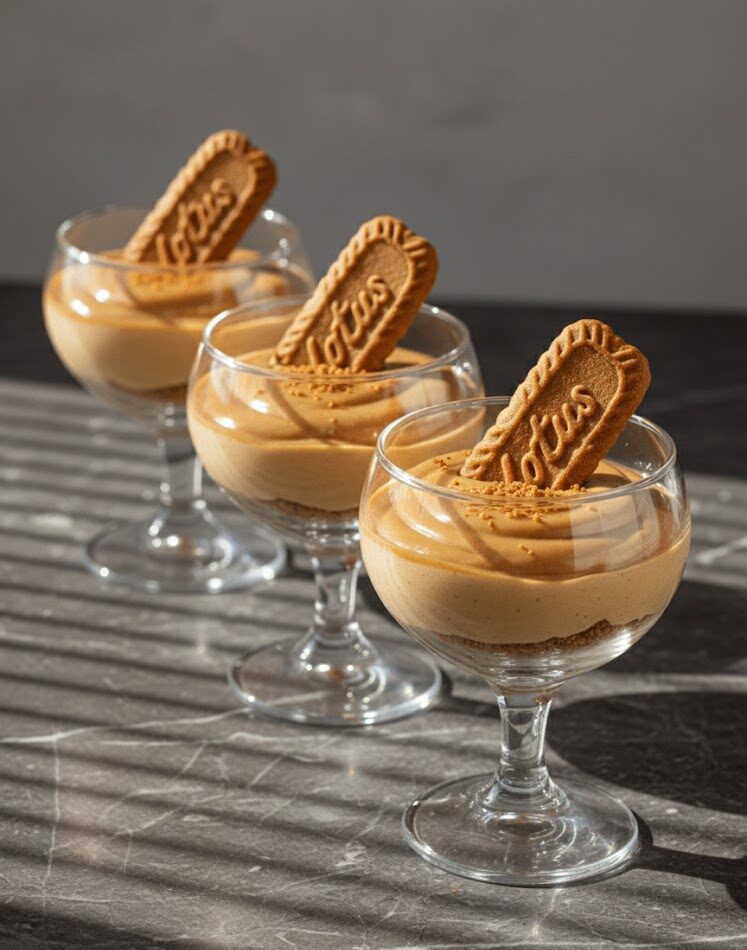
If you’re craving a dessert that looks impressive but doesn’t require hours in the kitchen, these No-Bake Biscoff Cheesecake Cups are exactly what you need. Individually portioned and packed with rich, spiced flavor, they combine the buttery crunch of Biscoff cookies with a creamy cheesecake filling and a glossy, indulgent topping.
Whether you’re planning a casual family dessert or a special occasion treat, these cups are a crowd-pleaser. The best part? You don’t even need to turn on the oven.
Why You’ll Fall in Love with These Cheesecake Cups
- Quick and Easy: Prep takes only about 20 minutes. The refrigerator does all the hard work while the flavors meld together.
- Rich Biscoff Flavor: Every bite has that signature caramel-cinnamon warmth you love in Biscoff cookies.
- No-Bake Convenience: Forget ovens, water baths, and long baking times. These cups are ready with minimal effort.
- Versatile for Any Occasion: Perfect for small gatherings, dinner parties, or simply enjoying as a personal indulgence.
Once you try them, these cheesecake cups are likely to become your go-to no-bake dessert.
Ingredients You’ll Need
Creating these cheesecake cups doesn’t require anything fancy. Most ingredients are pantry staples or easily found at your local grocery store:
For the crust:
- 30 Biscoff cookies, crushed into fine crumbs
- 2 tablespoons unsalted butter, melted
For the cheesecake filling:
- 2 cups heavy cream
- 8 ounces cream cheese, softened
- ½ cup powdered sugar
- ½ cup Biscoff spread (cookie butter)
- 1 teaspoon vanilla extract
For the topping:
- ½ cup Biscoff spread, melted
- 8 Biscoff cookies, halved for garnish
Optional: extra cookie crumbs for decoration
How to Make No-Bake Biscoff Cheesecake Cups
Step 1: Prepare the Crust
Crush the cookies into fine crumbs and combine them with melted butter. Press about 2–3 tablespoons of this mixture into the bottom of each dessert cup to form a sturdy base.
Step 2: Whip the Cream
In a large mixing bowl, whip the heavy cream until stiff peaks form. This will make your cheesecake filling light and airy.
Step 3: Make the Filling
In a separate bowl, beat the softened cream cheese with powdered sugar, vanilla extract, and Biscoff spread until smooth. Then gently fold in the whipped cream. Be careful not to deflate it—the filling should remain fluffy.
Step 4: Assemble the Cups
Spoon or pipe the cheesecake mixture over the cookie crust in each cup. Smooth the tops with a spatula or the back of a spoon.
Step 5: Add the Topping
Warm the Biscoff spread slightly until it’s pourable, then drizzle over the cheesecake filling. Garnish with halved cookies or sprinkle extra cookie crumbs on top for a professional look.
Step 6: Chill
Refrigerate the cups for at least 4 hours, or overnight for best results. This allows the filling to set properly and the flavors to blend beautifully.
Tips for the Best Cheesecake Cups
- Cold Cream Whips Best: Make sure your heavy cream is chilled before whipping.
- Soften Cream Cheese: Room temperature cream cheese mixes smoothly and prevents lumps.
- Don’t Rush the Chill: The cheesecake cups need sufficient refrigeration to set properly.
- Decorate Thoughtfully: Cookie halves, extra crumbs, or a light drizzle of Biscoff spread make them look bakery-ready.
FAQs
What flavor are Biscoff cookies?
They’re caramelized, spiced cookies with a buttery, cinnamon-like flavor, similar to gingersnaps but milder.
Can these cups be frozen?
It’s not recommended, as freezing can alter the creamy texture. Stick to refrigeration.
How far ahead can I make them?
You can prepare the cups up to 48 hours in advance. Keep them covered and chilled until ready to serve.
-
Prepare the crust: Crush the Biscoff cookies into fine crumbs. Mix with melted butter and press 2–3 tablespoons into the bottom of each dessert cup.
-
Whip the cream: In a large bowl, whip heavy cream until stiff peaks form.
-
Make the filling: In another bowl, beat the softened cream cheese with powdered sugar, vanilla extract, and Biscoff spread until smooth. Gently fold in the whipped cream.
-
Assemble the cups: Spoon or pipe the cheesecake filling over the cookie crust. Smooth the tops.
-
Add the topping: Warm the Biscoff spread slightly until pourable. Drizzle over the filling. Garnish with halved cookies or sprinkle extra crumbs.
-
Chill: Refrigerate for at least 4 hours, or overnight for best results. Serve chilled.
Notes
- Storage: Keep refrigerated for up to 3–4 days. Best served chilled.
- Cream Cheese: Make sure it’s softened to room temperature for a smooth filling.
- Chill Time: Don’t rush it—the cheesecake sets best after several hours in the fridge.
- Garnishing: Cookie halves, crumbs, or a light drizzle of extra Biscoff spread give a professional, bakery-style presentation.