
Few things rival the joy of slicing into a fresh, warm loaf of homemade sourdough bread. The crust is crisp, the crumb is soft and airy, and the flavor is rich with subtle tang. While many assume that making sourdough is complicated, the truth is it’s quite approachable once you understand the process. Even without professional baking experience, anyone can create a beautiful loaf at home.
This guide will walk you through a simple, no-knead sourdough recipe that is forgiving, adaptable, and utterly delicious. Once you’ve mastered this basic loaf, you can get creative with herbs, seeds, nuts, or dried fruit to make each bake uniquely yours.
Why Bake Sourdough at Home?
Baking your own sourdough comes with multiple benefits:
- Freshness: Nothing beats the flavor and aroma of freshly baked bread.
- Ingredient control: You decide exactly what goes into your loaf, whether that’s organic flour, whole grains, or specific seeds.
- Cost-effectiveness: Artisan sourdough from a bakery can cost $8–$12 per loaf, but homemade bread costs a fraction of that.
- Digestibility: Naturally fermented sourdough breaks down certain carbohydrates that can cause bloating or discomfort, making it easier to digest.
- Creativity: From adding olives and rosemary to experimenting with whole wheat or rye ratios, the possibilities are endless.
Even if your loaf isn’t picture-perfect the first few times, it will still taste amazing. Sourdough is forgiving and each bake teaches you more about the process.
Essential Ingredients and Tools
Before diving in, make sure you have the following ingredients:
Ingredients:
- 100 grams active sourdough starter
- 455 grams total flour (e.g., 295 g bread flour, 137 g whole wheat, 23 g rye; adjust as desired)
- 345 grams filtered water (start with 1.25 cups if you live in a humid climate)
- 10 grams salt (sea salt, kosher salt, or Himalayan)
Tools:
- Large mixing bowl
- Kitchen scale
- Banneton or proofing basket
- Dutch oven or cast iron combo cooker
- Bread lame for scoring (optional)
- Parchment paper
- Clean tea towel
Step 1: Feed Your Sourdough Starter
The first step is preparing your starter. It should be bubbly, active, and at its peak. Peak activity means it has doubled in size, is full of bubbles, and hasn’t yet begun to collapse.
- If stored in the fridge, remove your starter a day or two before baking and feed it once or twice to get it fully active.
- At room temperature, ensure your starter is well-fed and bubbly before combining it with the flour mixture.
The starter is the engine of your sourdough, providing natural yeast and beneficial bacteria to help your bread rise.
Step 2: Make the Autolyse
Autolyse is a simple process where flour and water are combined and allowed to rest, giving the flour time to absorb water and activate natural enzymes.
- Combine 455 grams of your chosen flours in a large bowl.
- Add most of the water (keep a small portion aside) and mix thoroughly.
- Cover and let it sit for about an hour at room temperature (around 70–75°F).
During this rest, the flour hydrates, which improves gluten development and makes the dough easier to handle later.
Step 3: Combine Starter, Salt, and Remaining Water
Once the autolyse is ready and your starter is active:
- Add 100 grams of starter, the remaining water, and 10 grams of salt to the dough.
- Mix with your hands, folding and pinching the dough until everything is evenly incorporated.
At this stage, the dough will be wetter and stickier than before. Don’t worry—this is normal.
Step 4: Slap and Fold (Optional but Helpful)
This technique helps tighten the dough and develop structure:
- Turn the dough out onto a clean counter.
- Lift it, fold it over itself, and slap it down.
- Repeat until the dough feels more elastic and manageable.
If you prefer, you can skip this step, but it can improve your loaf’s rise and texture.
Step 5: Bulk Fermentation
Return the dough to its bowl for bulk fermentation. Cover it and leave it at room temperature for about four hours. During this time, the starter will ferment the dough, creating bubbles and flavor.
Step 6: Stretch and Fold
During the first half of bulk fermentation, perform 3–4 sets of stretch and folds, spaced about 30 minutes apart:
- Wet your hands and gently lift one side of the dough, stretching it until it resists, then fold it over itself.
- Rotate the bowl and repeat.
This step strengthens the dough and introduces air, helping achieve a light, airy loaf.
Step 7: Shape the Loaf
After bulk fermentation:
- Turn the dough onto a lightly floured surface.
- Shape it to match your proofing basket—round (boule) or oval (batard).
- Allow a 10-minute bench rest, then shape again for a tighter structure.
- Place the dough in a lightly floured (or cloth-lined) banneton, pinched side down.
Step 8: Cold Proof
Cover the dough and place it in the fridge for 8–16 hours. Cold-proofing slows fermentation, enhancing flavor and improving dough structure. Longer proofing also makes the bread easier to digest and adds complexity to the taste.
Step 9: Preheat and Prepare to Bake
An hour before baking:
- Preheat your oven to 475–500°F.
- Place your Dutch oven or combo cooker inside to get piping hot.
A preheated cast iron pot creates steam from the dough itself, giving your loaf a beautiful rise and a crisp crust.
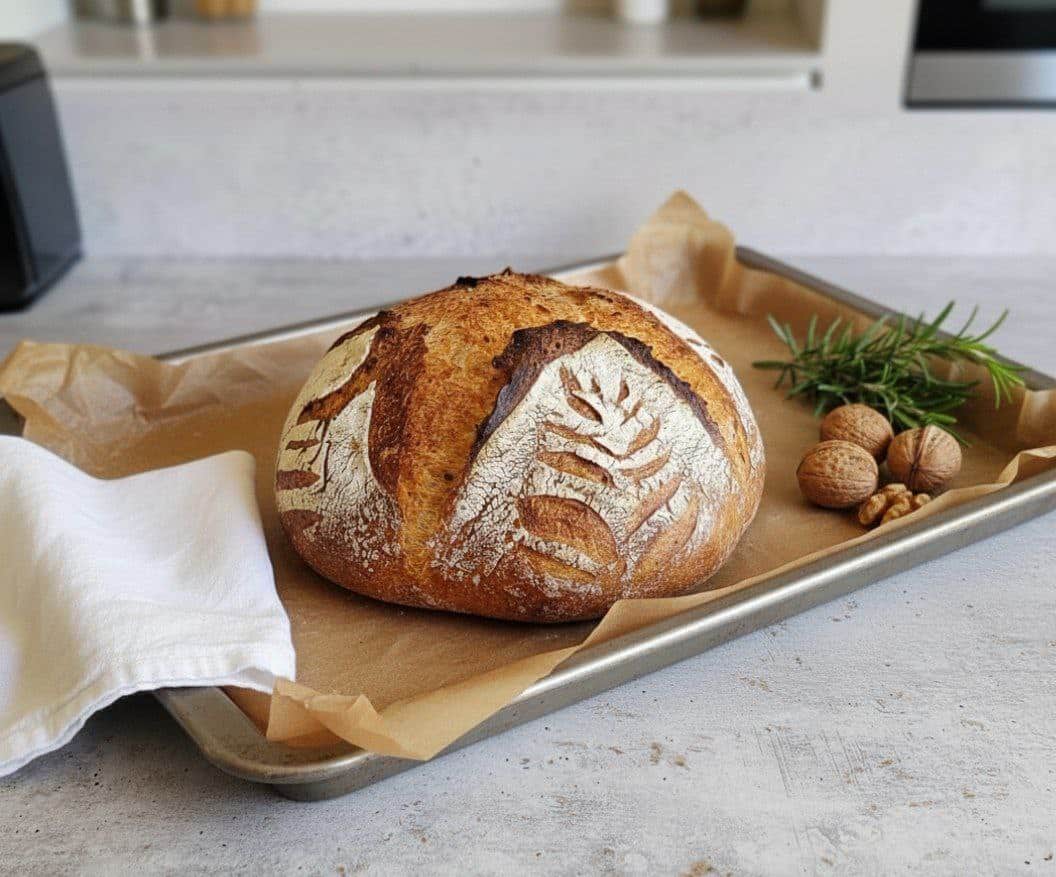
Step 10: Score and Bake
Once your oven and Dutch oven or combo cooker are fully preheated:
- Remove the dough from the fridge and carefully transfer it from the banneton to a piece of parchment paper.
- Optional: Lightly dust the dough with flour and score it with a bread lame. Scoring directs the expansion of the bread and can create beautiful patterns.
- Place the dough (with parchment) into the preheated Dutch oven or combo cooker. Cover and bake for 35 minutes.
- Remove the lid and bake for an additional 7–10 minutes uncovered until the crust is golden and crisp.
Tip: If the bottom of your loaf browns too quickly, place an empty baking sheet on the rack directly below your Dutch oven to deflect heat.
Step 11: Cooling and Slicing
Once baked:
- Remove the loaf from the oven and transfer it to a cooling rack.
- Let it cool at room temperature for at least a few hours before slicing. Cutting too soon can release steam and make the crumb gummy.
- Slice with a serrated bread knife for clean cuts.
Even if the holes inside your loaf aren’t enormous, it’s still perfect for sandwiches, toast, or serving with butter. Every loaf is unique, and flavor always trumps aesthetics!
Storing Homemade Sourdough
- Wrap your cooled loaf in a clean tea towel and place it inside a brown paper bag to retain freshness.
- Avoid storing in sealed containers, which can trap moisture and make the crust soft or moldy.
- Stale bread can always be refreshed with a quick toast or broil.
Optional Add-Ins
Once you’ve mastered this basic loaf, feel free to experiment:
- Fresh or dried herbs (rosemary, thyme, basil)
- Nuts or seeds (walnuts, sunflower seeds, flax)
- Olives, sundried tomatoes, or roasted garlic
- Dried fruit (cranberries, raisins, figs)
Add these either when you mix in the starter and salt or during the first set of stretch and folds. Adjust quantity depending on your preference.
- Feed Starter: Feed your sourdough starter and allow it to reach peak activity.
- Autolyse: Combine flour and most of the water in a bowl. Mix thoroughly and let sit for 1 hour at room temperature.
- Mix Dough: Add starter, remaining water, and salt to the autolyse. Mix by hand until combined.
- Slap & Fold (Optional): Work the dough on a clean surface to develop structure.
- Bulk Ferment: Cover and let dough rest for about 4 hours at room temperature.
- Stretch & Fold: Perform 3–4 sets of stretch and folds every 30 minutes during bulk fermentation.
- Shape: Turn dough onto a floured surface, shape to match your banneton, and allow a 10-minute bench rest. Place in a lightly floured proofing basket, pinched side down.
- Cold Proof: Cover and refrigerate for 8–16 hours.
- Preheat Oven: Preheat oven to 475–500°F with Dutch oven or combo cooker inside for 1 hour.
- Bake: Transfer dough to preheated pot on parchment, score if desired. Bake covered 35 minutes, then uncovered 7–10 minutes.
- Cool: Remove from oven, cool on a wire rack for several hours before slicing.
Notes
- Transferring Dough: Use parchment paper and a cutting board to flip the dough from banneton to pot.
- Baking Variations: Oven temperatures may vary; aim for a total bake of about 45 minutes.
- Burned Bottom: Place an empty baking sheet under the pot to deflect heat if needed.
- Doubling Recipe: Double ingredients for two loaves; split dough before shaping.