
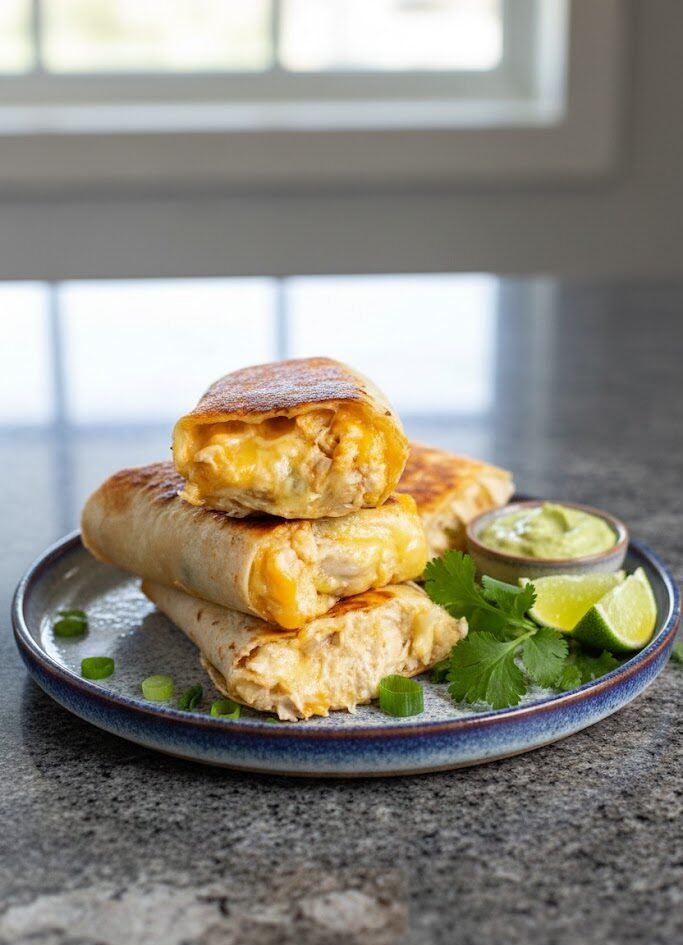
If you’re looking for a meal that’s comforting, easy, and packed with protein, these gooey garlic chicken wraps hit all the right notes. Crispy on the outside, cheesy and flavorful on the inside, they’re perfect for a quick lunch or a satisfying dinner. These wraps are low-effort but high-reward, combining tender chicken, melty cheese, and punchy garlic in every bite.
ezstandalone.cmd.push(function () { ezstandalone.showAds(122); });

What’s great is that these wraps are incredibly flexible—you can make them with leftover chicken, adapt the fillings, and even prep the mixture ahead of time. Whether you’re using regular tortillas or low-carb alternatives, the result is a golden, crunchy wrap with a rich, cheesy filling that will keep you coming back for more.
Why You’ll Love These Chicken Wraps
These wraps are a perfect balance of textures and flavors. The exterior crisps up beautifully when pan-fried, while the inside stays soft and gooey. The garlic is bold without being overpowering, and the combination of mayo, yogurt, and a touch of hot sauce creates a creamy, slightly tangy filling.
ezstandalone.cmd.push(function () { ezstandalone.showAds(130); });
Not only are these wraps satisfying and delicious, but they are also protein-rich, making them an ideal meal for anyone looking to stay full and energized. Bonus points: leftover filling works wonders in toasties, quesadillas, or even stuffed into baked potatoes.
Ingredients You’ll Need
Here’s a rundown of the basic ingredients for these garlic chicken wraps. You can adjust or add extra ingredients to suit your taste:
ezstandalone.cmd.push(function () { ezstandalone.showAds(131); });
- Tortillas – Large wheat or low-carb, high-protein options work well.
- Cooked chicken – Rotisserie chicken, grilled chicken, or leftovers are perfect.
- Garlic – Freshly minced for a fragrant, bold flavor.
- Mayo + Greek yogurt – Adds creaminess and a bit of tang. Light versions help reduce calories.
- Hot sauce – Just enough to give a gentle kick; Frank’s works beautifully.
- Shredded cheese – Cheddar or a blend for that perfect melt.
- Green onion – Adds a crisp, fresh touch; chives or red onion are alternatives.
- Olive oil spray – Helps achieve that golden, crispy exterior.
Optional Add-Ins
Feel free to get creative with extras: avocado, sun-dried tomatoes, spinach, mushrooms, olives, or even pickles. This recipe is a fantastic base for customizing flavors.
ezstandalone.cmd.push(function () { ezstandalone.showAds(132); });
Step-By-Step Preparation
Creating these wraps is straightforward and quick. Follow these steps for the perfect result:
- Mix the Filling: In a bowl, combine chopped chicken, garlic, mayonnaise, Greek yogurt, hot sauce, and a pinch of salt. This mixture is creamy, flavorful, and ready to be wrapped.
- Assemble the Wraps: Lay a tortilla flat and sprinkle a layer of cheese on the bottom third. Add the chicken mixture, another sprinkle of cheese, and top with chopped green onion.
- Fold and Roll: Fold the sides of the tortilla over the filling, then roll tightly from the bottom to secure everything inside.
- Cook the Wraps: Heat a non-stick pan over medium-high heat and lightly spray with olive oil. Place the wraps seam-side down, cooking 3–4 minutes per side until golden and crispy. Covering with a lid helps melt the cheese and warm the filling thoroughly.
- Serve: Slice in half and serve immediately for maximum gooey goodness.
Tips for Perfect Wraps
- Covering the pan while cooking helps ensure the cheese melts evenly and the inside stays warm.
- You can prepare the chicken mixture 2–3 days in advance and store it in the fridge.
- For a lighter version, reduce the cheese slightly, but the melty center is a big part of what makes these wraps special.
- Cooking in an air fryer works beautifully at 375°F (190°C) for 6–8 minutes, giving you a crisp exterior without extra oil.
ezstandalone.cmd.push(function () { ezstandalone.showAds(133); });
Serving Suggestions
These wraps are a complete meal on their own, but you can pair them with:
- A crunchy green salad for a lighter option
- Roasted or steamed vegetables for extra nutrition
- Pickles or salsa on the side for tang and flavor
- A handful of chips for a classic comfort food feel
Leftover filling can also be transformed into grilled cheese sandwiches, quesadillas, or stuffed baked potatoes, making this recipe highly versatile and great for meal prep.
ezstandalone.cmd.push(function () { ezstandalone.showAds(134); });

Storage and Make-Ahead Tips
- Make-Ahead: Prepare the chicken mixture 2–3 days in advance and store in the fridge until ready to assemble.
- Storage: Cooked wraps keep in the fridge for up to 2 days. Reheat in a skillet or air fryer to restore the crispiness.
- Freezing: The filled wraps are best eaten fresh, but the chicken filling freezes well for up to 1 month. Thaw overnight in the fridge before using.

Gooey Garlic Chicken Wraps: Crispy, Cheesy, and Packed with Flavor

Prep Time: 15 min
Cook Time: 7 min
Total Time: 22 min
const share_pin_buttons = document.getElementsByClassName( ‘share-pin button’ );
if ( share_pin_buttons ) {
for ( let share_key = 0; share_key {
e.stopPropagation();
window.open(e.target.dataset.href,’targetWindow’,’toolbar=no,location=no,status=no,menubar=no,scrollbars=yes,resizable=yes,width=500,height=500′);
return false;
} );
}
}
Ingredients
2 large tortillas (regular or low-carb/high-protein)
7 oz (200 g) cooked chicken, chopped (rotisserie or leftovers)
2 garlic cloves, minced or grated (adjust to taste)
2 tablespoons light mayonnaise
1 tablespoon light Greek yogurt or plain yogurt
2 teaspoons hot sauce (such as Frank’s)
¼ teaspoon salt
3 oz (90 g) grated cheese (cheddar or cheddar blend)
ezstandalone.cmd.push(function () { ezstandalone.showAds(135); });
1 green onion, chopped
Olive oil spray
Instructions
- In a bowl, mix chopped chicken, garlic, mayonnaise, Greek yogurt, hot sauce, and salt until well combined.
- Lay out a tortilla. Sprinkle 2 tablespoons of cheese on the lower third. Add about ⅔ cup of chicken mixture, then another tablespoon of cheese and green onion on top.
- Fold in the sides of the tortilla and roll tightly from the bottom.
- Heat a non-stick pan over medium-high heat and lightly spray with olive oil. Place wraps seam-side down and cook 3–4 minutes per side until golden and crispy. Cover to help melt cheese and heat the filling.
- Slice in half and serve immediately.
Notes
- Covering the pan helps melt cheese evenly and warms the filling thoroughly.
- Chicken filling can be made ahead and stored in the fridge for up to 3 days.
- Reduce cheese for a lighter version, but the gooey center is part of the magic.
- Air fryer method: Cook at 375°F (190°C) for 6–8 minutes.
- Baking option: Bake at 400°F (200°C) for 10–12 minutes, flipping once. Pan-frying gives a crispier exterior.
- Use leftover filling in sandwiches, quesadillas, or baked potatoes.