
Some recipes arrive in your life loudly, with precise measurements, step-by-step notes, and perfectly timed instructions. Others drift in quietly, shaped by memory, repetition, and the rhythm of home kitchens. This apple fritter bread belongs firmly in the second category.
You only need one apple to make this loaf, though no one will fault you for adding a second if the mood strikes. In fact, many home bakers do. The charm of this bread is that it never pretends to be complicated. It’s a humble quick bread, inspired by old farm kitchens where ingredients were used wisely and nothing was wasted.
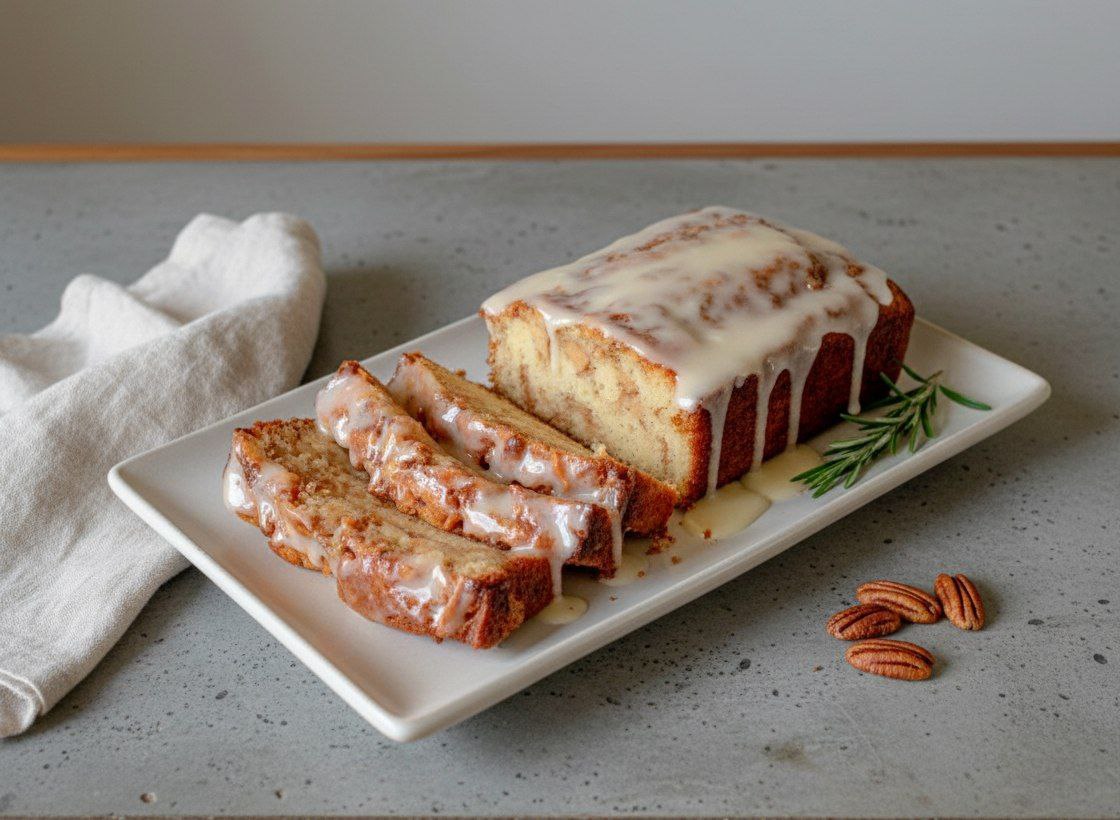
This loaf tastes like autumn afternoons, worn wooden tables, and the comforting smell of cinnamon filling the house. It’s sweet without being cloying, rich without being heavy, and finished with a simple sour cream glaze that melts into the top like a final blessing.
A Recipe Rooted in Tradition
This apple fritter bread comes from a style of baking that values practicality and flavor over perfection. It’s the kind of recipe that would be written on a notecard, smudged with butter, and passed from one kitchen drawer to another. The method is straightforward, the ingredients familiar, and the result deeply comforting.
While classic fried apple fritters inspired this loaf, it’s baked rather than fried, making it easier to prepare and far less messy. The glaze, however, pays quiet homage to those old fritters—tangy, sweet, and just thin enough to drizzle generously over the cooled bread.
Why This Apple Fritter Bread Works So Well
There are many apple breads out there, but this one stands apart for a few reasons:
- The apples are lightly macerated with brown sugar and cinnamon before baking, which draws out their juices and concentrates flavor.
- The batter is mixed gently, creating a tender crumb rather than a dense loaf.
- Layering the apples instead of mixing them fully into the batter creates a natural swirl effect.
- The sour cream glaze adds contrast, balancing sweetness with a subtle tang.
It’s not flashy. It doesn’t need to be. This bread is all about balance and familiarity.
How This Recipe Fits the Season
As the colder months approach, baking naturally becomes more nostalgic. This is the time of year when quick breads shine—easy to prepare, generous in yield, and perfect for sharing. This apple fritter bread is especially suited for gifting, whether wrapped in parchment or baked directly in decorative paper loaf pans.
It’s also a wonderful recipe for slowing down. The process encourages patience: allowing the apples to sit, letting the loaf cool completely, and waiting just a little longer before adding the glaze. These small pauses matter. They’re what turn baking into something more than following instructions.
Do You Have What You Need? Check the Ingredients
Before starting, it helps to gather everything in advance. This is a pantry-friendly recipe, relying on everyday baking staples.
For the Apple Bread
- A large tart apple, such as Granny Smith
- Brown sugar
- Ground cinnamon
- All-purpose flour
- Baking powder
- Salt
- Granulated sugar
- Unsalted butter
- Eggs
- Whole milk
- Vanilla extract
For the Creamy Glaze
- Sour cream
- Powdered sugar
- Vanilla extract
- A small amount of milk (if needed)
Simple ingredients, carefully combined, do all the work here.
How to Make Apple Fritter Bread
Before you begin, consider how you plan to serve or gift this loaf. Once the glaze is added, the bread becomes delicate to handle. Baking it in paper loaf pans can make gifting much easier and far less stressful.
Start by peeling, coring, and dicing the apple into small, bite-sized pieces. These chunks should be noticeable in the finished loaf but not so large that they sink or overpower the batter.
Place the apples in a bowl with brown sugar and cinnamon. Stir gently and let the mixture rest for about 15 minutes. This step softens the apples and builds flavor without any extra effort.
In a separate bowl, combine the dry ingredients. Sifting is optional, but it helps ensure even distribution.
Cream the butter and granulated sugar until light and smooth. Add the eggs, followed by milk and vanilla. Once the wet ingredients are combined, fold in the dry ingredients just until no dry flour remains. The batter should look slightly lumpy—overmixing will lead to a tough loaf.
Layering is key. Spread half the batter into the prepared pan, then spoon half the apple mixture over it. Repeat with the remaining batter and apples. Use a knife to gently swirl the layers together, creating ribbons of apple throughout the loaf.
Baking Time and Doneness
This bread bakes slowly, allowing the apples to soften fully and the loaf to rise evenly. The top should be deeply golden, and a toothpick inserted into the center should come out clean or with just a few moist crumbs.
Once baked, let the loaf cool briefly in the pan, then transfer it to a wire rack. It must cool completely before glazing. Rushing this step will cause the glaze to melt and slide off instead of setting beautifully on top.
Mini Loaf Pans: What to Know
This recipe adapts well to smaller loaf pans, but size matters. Pans that are too small can cause the bread to dry out. A 6 x 3-inch pan is ideal if you want individual loaves. Begin checking for doneness earlier, as smaller loaves bake faster.
Storage and Make-Ahead Tips
Because the glaze contains sour cream, the finished loaf should be stored in the refrigerator. Covered well, it stays fresh for several days.
If you plan to freeze the bread, do so without the glaze. Wrapped tightly, it freezes beautifully and can be thawed and glazed just before serving.
The Creamy Glaze That Brings It All Together
What truly sets this apple fritter bread apart is the glaze. While the loaf itself is tender, fragrant, and generously filled with apples, the glaze adds that final layer of indulgence. Made with sour cream, powdered sugar, and vanilla, it delivers a gentle tang that balances the sweetness of the bread instead of overwhelming it.
The key is restraint and timing. The bread must be completely cool before glazing. When done correctly, the glaze settles into the top, lightly soaking into the crust while still leaving a soft, visible drizzle. It’s subtle, elegant, and unmistakably comforting.
If you prefer a lighter finish, you can thin the glaze slightly with milk. For a thicker, bakery-style look, keep it dense and let it cascade naturally down the center of the loaf.
Serving Ideas and Occasions
This apple fritter bread fits effortlessly into many moments:
- Breakfast or brunch: Slice and serve slightly chilled or at room temperature.
- Afternoon coffee: A single slice pairs beautifully with coffee or tea.
- Holiday gifting: Wrapped in parchment or baked in paper loaf pans, it makes a thoughtful homemade gift.
- Dessert: Serve with a spoonful of lightly sweetened whipped cream.
It’s not flashy or dramatic, but it’s dependable—and that’s exactly the point.
Troubleshooting Common Issues
Even simple recipes can raise questions. Here are a few helpful tips:
- Bread too dense: This usually means the batter was overmixed. Stir only until combined.
- Apples sinking: Layering the apples instead of folding them in prevents this.
- Dry loaf: Avoid baking in pans smaller than recommended and check for doneness early.
- Glaze sliding off: The bread was likely still warm. Cooling fully is essential.
Make the Apple Bread
-
Preheat the oven to 350°F (175°C). Grease an 8 x 4-inch loaf pan. Line with parchment if desired.
-
In a bowl, combine diced apples, brown sugar, and cinnamon. Stir and let rest for 15 minutes.
-
In another bowl, whisk together flour, baking powder, and salt.
-
In a large mixing bowl, cream the butter and granulated sugar until light and smooth.
-
Add eggs, then mix in milk and vanilla.
-
Gently fold in the dry ingredients just until combined. Do not overmix.
-
Pour half of the batter into the prepared pan. Spoon half of the apple mixture over the batter.
-
Add the remaining batter, then top with the remaining apples.
-
Use a knife to gently swirl the layers in a loose ribbon pattern.
-
Bake for 55–60 minutes, or until a toothpick inserted in the center comes out clean.
-
Cool in the pan for 10 minutes, then remove and cool completely on a wire rack.
Make the Glaze
-
In a small bowl, whisk sour cream, powdered sugar, and vanilla until smooth.
-
If the glaze is too thick, add milk one teaspoon at a time until drizzle consistency is reached.
-
Drizzle over the completely cooled loaf before slicing.
Notes
- This bread stores best in the refrigerator once glazed and will keep for up to 5 days.
- Unglazed bread may be stored at room temperature for up to 3 days.
- For mini loaves, use pans no smaller than 6 x 3 inches and begin checking for doneness at 30 minutes.
- To freeze, wrap unglazed loaves tightly and freeze for up to 3 months. Thaw fully before glazing.