
Easter isn’t just about chocolate bunnies and pastel baskets—it’s also the perfect time to bake festive treats that double as art. One of the most fun and creative cookies to make during this season is the classic Easter egg sugar cookie. Crisp on the outside, tender inside, and topped with colorful royal icing designs, these cookies are sure to impress both kids and adults.
Whether you’re hosting an Easter brunch, packing school treats, or making a special gift for friends, these cookies are a showstopper. And the best part? Decorating them doesn’t require fancy skills. Simple swirls, dots, and stripes are all you need to turn these cookies into miniature edible masterpieces.
Why Easter Egg Sugar Cookies Are Perfect for Spring
Sugar cookies are versatile, easy to bake, and provide a blank canvas for creativity. For Easter, this means you can experiment with pastel colors, floral patterns, or even little bunny faces. The texture is perfect: firm enough to hold a shape, yet soft and tender once baked.
Using royal icing allows you to create clean, polished designs that dry beautifully and stay in place. Plus, these cookies are a great activity to enjoy with kids, letting everyone explore their artistic side.
Ingredients You’ll Need
For the perfect batch of Easter egg sugar cookies, gather the following ingredients:
Sugar Cookies:
- Unsalted butter (softened to room temperature)
- Granulated sugar
- One large egg
- Vanilla extract
- Baking powder
- Salt
- All-purpose flour
Royal Icing:
- Confectioners’ sugar
- Meringue powder
- Water
- Vanilla extract
- Gel food coloring (for decorating)
These ingredients are easy to find in most kitchens, and the icing can be colored to match any festive theme you like.
Essential Kitchen Tools
To make the baking and decorating process smooth, you’ll also need:
- Measuring cups and spoons
- Mixing bowls
- Stand mixer or hand mixer
- Rolling pin
- Egg-shaped cookie cutter
- Half-sheet baking pan lined with parchment paper or a silicone mat
- Wire cooling rack
- Piping bags with couplers
- Piping tips: no. 5 for the base and no. 1 or 2 for the detailed patterns
Having the right tools makes decorating easier and helps your cookies look professional without extra effort.
How to Make the Best Easter Egg Sugar Cookies
Creating these festive cookies is a fun process that can be done in a few simple steps. Here’s how to achieve golden-brown, soft-centered cookies that are perfect for decorating:
1. Make the Dough
Start by creaming the softened butter and sugar together until light and fluffy. This usually takes about two minutes on medium speed with a mixer. Then, add the egg and vanilla, mixing until everything is well combined. Reduce the speed, and gradually mix in the baking powder, salt, and flour until a soft dough forms.
Wrap the dough in plastic wrap and chill it in the refrigerator for at least an hour, or freeze for 30 minutes if short on time. Chilling helps the cookies hold their shape when cut.
2. Cut and Bake the Cookies
Once chilled, let the dough sit at room temperature for a few minutes to make rolling easier. Roll the dough out on a lightly floured surface to about ¼-inch thick. Use an egg-shaped cookie cutter to cut out your Easter egg shapes.
Place the cookies on a prepared baking sheet, leaving a little space between each. Re-roll the scraps to make more cookies. Bake in a preheated oven at 350°F (175°C) for 8-10 minutes or until the edges just start turning golden. Cool the cookies for a few minutes on the baking sheet before transferring them to a wire rack to cool completely.
3. Make Royal Icing
Royal icing is what gives Easter egg sugar cookies their beautiful, smooth finish. Instead of raw egg whites, this recipe uses meringue powder for a safe and stable icing.
Combine the confectioners’ sugar and meringue powder in a bowl. Add water and vanilla extract, then beat with a mixer until smooth. Adjust consistency with a little water if too thick, or extra sugar if too thin. Divide the icing into separate bowls and color each portion with gel food coloring.
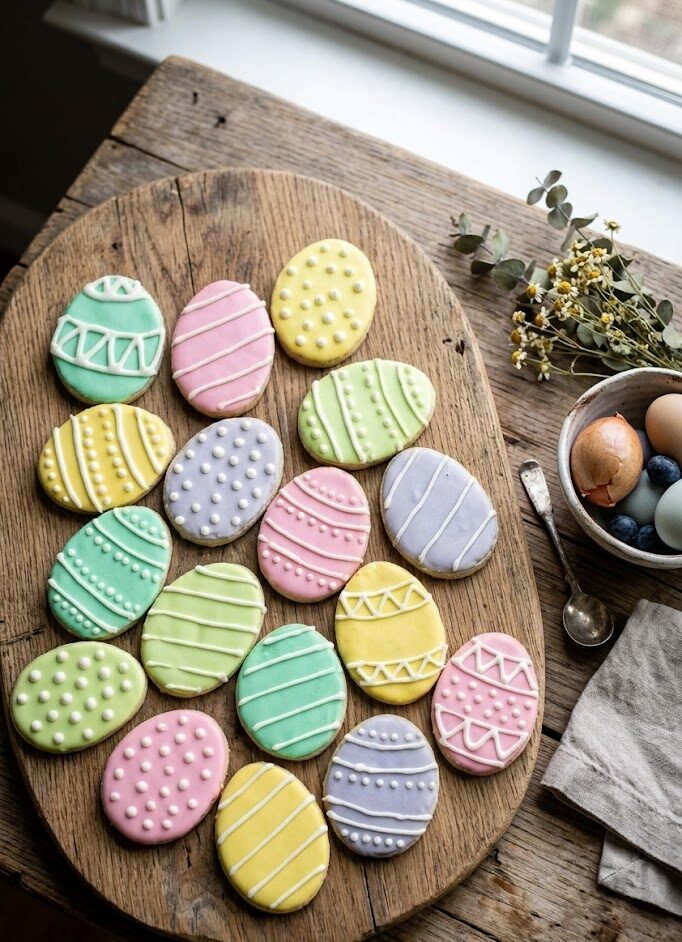
How to Decorate Easter Egg Sugar Cookies
Decorating your sugar cookies is the fun part where you can really let your creativity shine. Using royal icing, you can create vibrant, intricate designs without needing advanced skills.
- Base Layer: Use a no. 5 round piping tip to outline the cookie with your base color, leaving about ⅛ inch from the edge. Fill in the inside with more icing and use the back of a spoon to spread it evenly. Allow the base layer to dry for 20-30 minutes until it is set enough to hold the next layer without smudging.
- Adding Patterns: Switch to a thin no. 1 or 2 piping tip to add fun designs like lines, swirls, polka dots, or zigzags. You can mix and match patterns to make each cookie unique. The possibilities are endless—try pastel stripes, polka dots, or even floral touches for a spring-inspired look.
- Drying: Let the icing fully harden for a few hours or up to a day. This ensures the cookies are easy to store, transport, or gift without the designs getting ruined.
Tips for Perfect Cookies
- Plan Ahead: Baking and decorating Easter egg sugar cookies takes time. Chill the dough, cool the cookies fully, and allow the icing to set completely. Rushing any step can affect the shape or texture.
- Layering Icing: If using multiple icing layers, always let the previous layer dry for at least 30 minutes to prevent colors from running together.
- Storage: Once decorated and fully dry, store in an airtight container at room temperature for up to 3 days, or refrigerate for up to one week.
- Freezing: These cookies freeze beautifully. Layer with parchment paper in an airtight container and freeze for up to 3 months. Thaw at room temperature before serving.
These cookies are perfect for Easter baskets, gifting, or even as part of a dessert table for a spring gathering. With simple steps and a little creativity, you can make cookies that look professional and taste incredible.
- Prepare the Dough: Cream butter and sugar together until light and fluffy. Add egg and vanilla and mix well. Combine baking powder, salt, and gradually add flour. Wrap dough and chill for at least 1 hour.
- Cut and Bake: Preheat oven to 350°F (175°C). Roll dough ¼-inch thick and cut into egg shapes. Bake 8-10 minutes until edges are lightly golden. Cool completely.
- Make Royal Icing: Beat confectioners’ sugar and meringue powder with water and vanilla until smooth. Divide and color with gel food coloring. Adjust consistency if needed.
- Decorate Cookies: Pipe base layer with no. 5 tip and allow to set 20-30 minutes. Use thin no. 1 or 2 tip to add lines, dots, or swirls. Let icing fully harden before storing.
Notes
- Dough can be made a day ahead and refrigerated overnight for convenience.
- Gel food coloring works best for vibrant designs without altering icing consistency.
- These cookies are ideal for gifting—package in a single layer or between parchment sheets.
- Adjust icing consistency by adding small amounts of water or sugar until it spreads smoothly but holds its shape.