
If you’re looking to bring back excitement to your breakfast or dessert routine, these Gluten Free Baked Pears might be exactly what you need. Simple, comforting, and naturally sweet, this recipe transforms everyday pears into a warm, flavorful dish that feels both indulgent and nourishing. Whether you enjoy them in the morning with yogurt or serve them as a light dessert, baked pears are one of those recipes you’ll find yourself coming back to again and again.
There’s something incredibly satisfying about recipes that rely on whole, easy-to-find ingredients. Much like classic homemade comfort foods, this dish celebrates natural flavors while leaving plenty of room for customization. Over time, it can easily become one of your go-to seasonal favorites—especially during the cooler months when warm, cozy dishes are most appreciated.
Picture tender pears fresh out of the oven, lightly caramelized, infused with warm spices, and topped with crunchy nuts or seeds. It’s simple, beautiful, and absolutely delicious.
Why You’ll Love These Gluten Free Baked Pears
It’s easy to fall into repetitive meal habits, especially when life gets busy. Recipes like this help break that cycle. These baked pears are:
- Naturally gluten free, making them suitable for a wide range of diets
- Quick to prepare with minimal ingredients
- Highly customizable depending on your taste preferences
- Perfect for breakfast, snacks, or dessert
From the first time you try them, you’ll notice how effortlessly they fit into your daily routine. You can enjoy them warm straight from the oven or save them for later—they’re just as good the next day.
Ingredients for Gluten Free Baked Pears
This recipe follows a simple formula that you can easily adapt. Each ingredient plays a role in creating that perfect balance of sweetness, warmth, and texture.
Fresh Pears
Choose ripe but firm pears. They should be soft enough to bake beautifully but not so soft that they fall apart.
Natural Sweetener
Honey or maple syrup works wonderfully here. It enhances the natural sweetness of the pears while helping create that caramelized finish.
Healthy Fat
A small amount of coconut oil or butter helps the pears roast evenly and adds richness to the dish.
Nuts or Seeds
Chopped almonds, walnuts, or pecans add crunch and a boost of protein. For a nut-free option, try sunflower or pumpkin seeds.
Warm Spices
Cinnamon is the classic choice, but you can also add a pinch of nutmeg, ginger, or allspice for extra depth.
Vanilla Extract
A splash of vanilla ties all the flavors together and gives the dish a comforting aroma.
Optional Add-ins
You can include dried fruits like raisins or cranberries after baking for extra texture and sweetness.
Variations and Substitutions
One of the best things about this recipe is how flexible it is. You can easily adjust it to match your preferences or what you have in your kitchen.
- Swap the sweetener: Use agave syrup or date syrup instead of honey or maple syrup.
- Change the fat: Coconut oil, olive oil, or even a small amount of butter all work well.
- Try different nuts: Pistachios, cashews, or hazelnuts can completely change the flavor profile.
- Go nut-free: Replace nuts with seeds like chia, flax, or sunflower seeds.
- Add chocolate: A few dark chocolate chips added after baking can make this feel like a dessert.
- Boost the flavor: Add orange zest or a splash of lemon juice for a fresh twist.
This flexibility makes it easy to reinvent the recipe every time you make it.
How to Enjoy Baked Pears
While these gluten free baked pears are delicious on their own, there are many ways to incorporate them into meals:
With Yogurt
Serve warm pears over a bowl of yogurt for a balanced and satisfying breakfast.
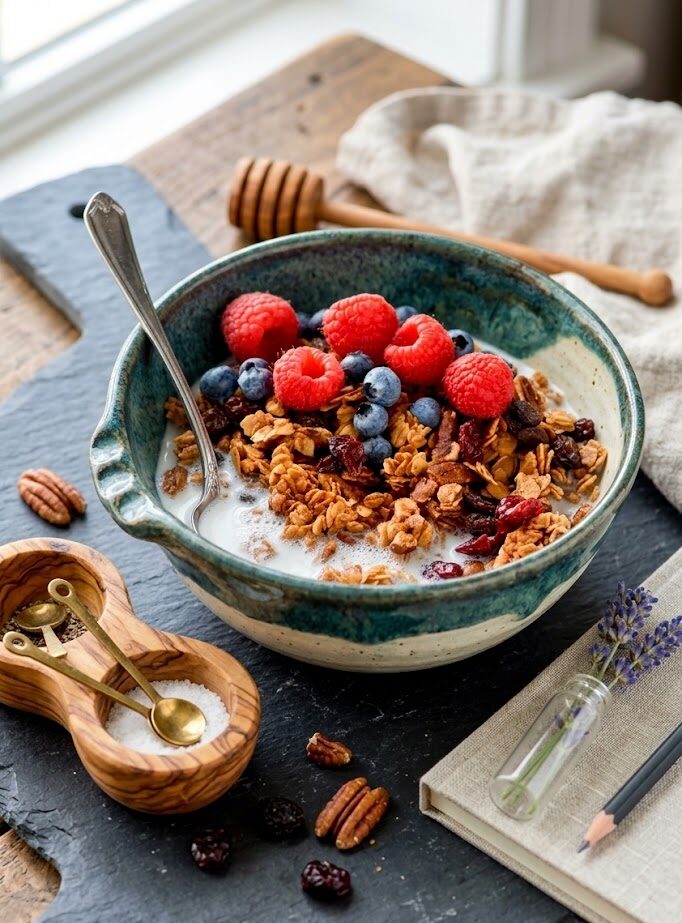
As a Parfait
Layer baked pears with yogurt and granola for a beautiful and filling parfait.
With Oatmeal
Add them on top of oatmeal for extra flavor and natural sweetness.
As a Dessert
Pair with a scoop of vanilla ice cream or a drizzle of cream for a simple yet elegant dessert.
On Their Own
Sometimes, the best way to enjoy them is straight from the baking dish with a spoon.
Storage and Make-Ahead Tips
If you like to plan ahead, this recipe is perfect for meal prep.
- Refrigeration: Store baked pears in an airtight container in the fridge for up to 4 days.
- Reheating: Warm them in the microwave or oven before serving.
- Freezing: You can freeze them in individual portions. Let them thaw overnight in the refrigerator before reheating.
Having a batch ready to go makes it easier to enjoy a healthy, homemade option whenever you need it.
Bringing Joy Back to Simple Recipes
It’s easy to overlook simple dishes like baked pears, but they often become the most memorable. They remind us that good food doesn’t have to be complicated. With just a few ingredients and a little time, you can create something that feels both comforting and nourishing.
This recipe is also a great way to use seasonal fruit in a creative way. Instead of reaching for processed snacks or desserts, you can enjoy something homemade that still satisfies your sweet cravings.
Step-by-Step Instructions
Start by preheating your oven to 180°C (350°F). This moderate temperature allows the pears to soften धीरे while developing a rich, caramelized flavor without burning.
Prepare your baking dish by lightly greasing it or lining it with parchment paper. This helps prevent sticking and makes cleanup easier.
Next, wash your pears thoroughly. Slice them in half lengthwise and gently remove the core using a spoon or melon baller. If the pears wobble, you can trim a small slice from the bottom to help them sit flat.
In a small bowl, whisk together your sweetener (honey or maple syrup), melted coconut oil (or butter), vanilla extract, cinnamon, and a pinch of salt. This mixture will coat the pears and infuse them with flavor as they bake.
Arrange the pear halves cut-side up in your prepared baking dish. Spoon the mixture evenly over each pear, making sure they are well coated.
Sprinkle your chopped nuts or seeds on top. This will create a slightly crunchy texture that contrasts beautifully with the soft pears.
Place the dish in the oven and bake for 25 to 35 minutes, depending on the ripeness of your pears. You’ll know they’re ready when they are fork-tender and lightly golden around the edges.
About halfway through baking, spoon some of the juices from the bottom of the dish over the pears. This keeps them moist and enhances the flavor.
Once baked, remove from the oven and allow them to cool slightly. At this stage, you can add optional toppings like dried fruit or a drizzle of extra honey.
Pro Tips for Perfect Baked Pears
- Choose the right pears: Slightly firm pears hold their shape better during baking.
- Don’t skip basting: Spoon the juices over the pears for extra flavor.
- Watch the oven closely: Overbaking can make pears too soft.
- Let them cool slightly: This helps the flavors settle and intensify.
- Preheat oven to 180°C (350°F) and prepare a baking dish.
- Cut pears in half and remove cores.
- In a bowl, mix honey, oil, vanilla, cinnamon, and salt.
- Place pears cut-side up in the dish.
- Spoon the mixture evenly over the pears.
- Sprinkle nuts on top.
- Bake for 25–35 minutes until tender and golden.
- Baste with juices halfway through baking.
- Remove from oven, let cool slightly, then add dried fruit.
- Serve warm and enjoy.
Notes
- You can reduce or skip the oil for a lighter version, but the texture will be less rich.
- Maple syrup works great as a vegan alternative to honey.
- For a nut-free option, replace nuts with seeds like sunflower or pumpkin seeds.
- Add chocolate chips after baking for a dessert-style variation.
- Make sure your ingredients are certified gluten free if serving someone with gluten sensitivity.