
Celebrate Easter with a delightful, no-bake mini egg mini cheesecake that’s perfect for small batch baking. With a buttery biscuit base and creamy, vanilla-infused cheesecake filling, this recipe serves 4-6 and is ideal when you want a smaller, manageable portion without compromising on flavor.
Easter-Inspired Baking
Easter is a magical time in the kitchen, full of pastel colors, chocolate treats, and a touch of spring zest. This year, I wanted to focus on small batch baking – because sometimes, big cakes aren’t necessary. Small batch recipes are perfect whether you live alone, have a small household, or simply want to experiment with multiple desserts without wasting ingredients.
I’ve always had a soft spot for anything mini egg themed. They are a favorite among my readers, especially around Easter. From my mini egg NYC cookies to my full-sized mini egg cheesecakes, these treats always make an appearance. This mini egg mini cheesecake combines that love into a single, showstopping dessert, perfectly portioned for 4-6 servings.
Why Small Batch Baking?
Small batch bakes are designed for convenience without skimping on taste. Standard cheesecake recipes often serve 12-16 people, which can be overwhelming if you’re only feeding a few. By scaling down, you get the satisfaction of a full cheesecake but in a more manageable size.
For this mini egg mini cheesecake, I aimed for a 6″ cake tin serving 4-6 slices. Of course, slice sizes vary—if you’re feeling generous, four hearty slices will do just fine! Small batch baking also allows you to test out flavors and combinations without committing to a large dessert.
The Perfect Cheesecake Base
A strong base sets the stage for any cheesecake. I recommend using full-fat, full-sugar biscuits. These provide the right texture and flavor balance. For this recipe, a simple digestive biscuit works beautifully.
- Ratio for the base: Mix 1 part melted butter with 2 parts crushed biscuits. The mixture should have a wet-sand texture and press firmly into the bottom of a 6″ loose-bottomed cake tin.
- Tip for lighter biscuits: If using a lighter digestive or a less buttery biscuit, start with half the amount of butter and adjust as needed. This prevents a soggy base.
- For chocolate or filled biscuits: Use roughly 2/3 of the butter quantity since these biscuits often need less binding.
A firm, even base will hold your cheesecake together and make slicing easier, while also adding a rich, buttery flavor that complements the sweet filling perfectly.
Creamy Cheesecake Filling
The filling is the heart of this dessert. For a smooth, no-bake cheesecake, I rely on a combination of:
- Full-fat soft cream cheese
- Icing sugar for sweetness
- Double cream (heavy cream in some regions)
- Vanilla extract (I use bean paste for little flecks of vanilla)
- Lemon juice to help set the cheesecake
The lemon juice doesn’t alter the flavor noticeably—it just helps the cheesecake hold its shape. Once the base mixture is prepared, fold in crushed mini eggs to give that signature Easter crunch and color. Spread the filling evenly over the base and refrigerate to set. For best results, allow it to chill overnight.
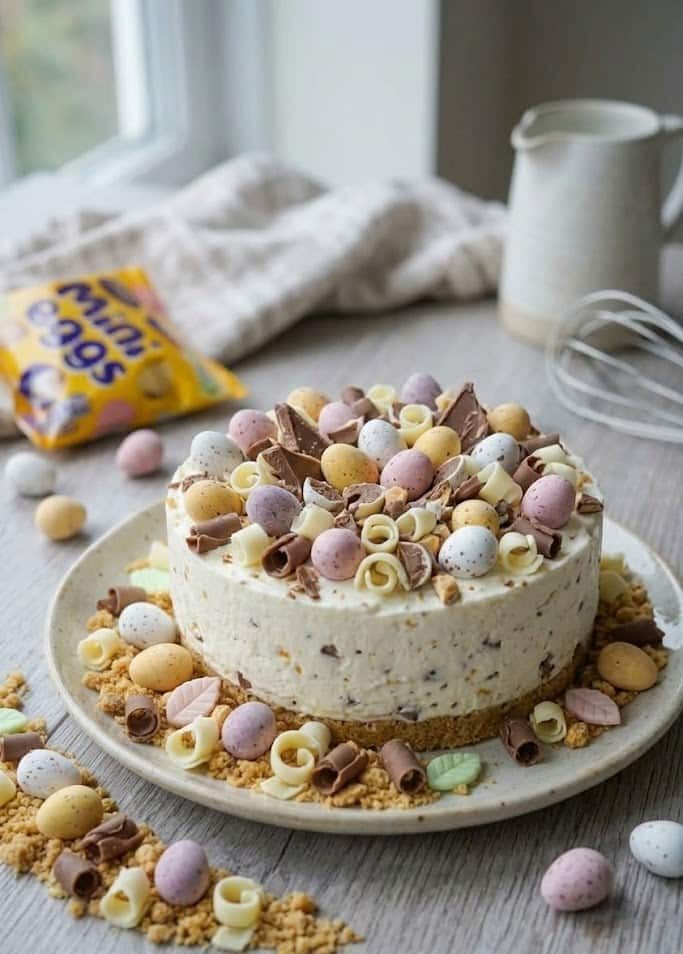
Decorating Your Mini Cheesecake
The decoration is where creativity meets indulgence. A simple topping of whipped double cream sweetened with a little icing sugar adds elegance. Sprinkle extra whole and crushed mini eggs on top for a festive, eye-catching finish. This makes the mini cheesecake not only delicious but also a fun centerpiece for Easter brunch or a spring gathering.
Prepping, Storing, and Serving
Making a cheesecake is a two-step process: preparation and setting. I recommend preparing the cheesecake the day before you plan to serve it.
- Setting time: Ideally 6-12 hours in the fridge to achieve the perfect creamy texture.
- Storage: Cover and store in the fridge for up to 3 days.
- Freezing: This cheesecake freezes well for 3+ months if wrapped properly.
I use a deep, 6″ loose-bottomed cake tin for easy removal. While lining the tin is optional, it can provide extra security. Use a handheld or stand mixer to whip the filling, but be careful not to overmix. For added stability, you can incorporate a setting agent like gelatin.
Biscuit Base
-
Blitz the digestive biscuits into fine crumbs.
-
Mix the melted butter into the crumbs until the texture resembles wet sand.
-
Press the mixture firmly into the base of a loose-bottomed 6″ cake tin. Chill in the fridge while preparing the filling.
Cheesecake Filling
-
In a mixing bowl, combine cream cheese, icing sugar, and vanilla extract. Whisk until smooth.
-
Gradually add double cream and lemon juice, continuing to whip until thick and creamy.
-
Gently fold in crushed mini eggs.
-
Spread the filling evenly over the chilled biscuit base. Refrigerate for at least 5–6 hours or overnight for best results.
Decoration
-
Carefully remove the cheesecake from the tin.
-
Whip together double cream and icing sugar until soft peaks form. Dollop on top of the cheesecake.
-
Sprinkle with extra mini eggs, whole or crushed, for a festive look.
Notes
- Chilling: Allowing the cheesecake to set overnight gives the best texture and makes slicing easier.
- Storage: Keep refrigerated and covered for up to 3 days.
- Freezing: Wrap tightly and freeze for up to 3 months. Thaw in the fridge before serving.
- Cheesecake Tin: A 6″ deep loose-bottomed tin works best. Lining is optional.
- Mixing: Use a handheld or stand mixer but avoid overwhipping.
- Setting Agent: If desired, add gelatin or another setting agent for a firmer finish.
- Mini Egg Variety: Feel free to mix crushed and whole mini eggs for texture and visual appeal.