
If you’re looking for a stunning dessert that requires no oven time, this No-Bake Layered Jelly Cheesecake is exactly what you need. It’s colorful, creamy, and perfect for special occasions like Easter, birthdays, or family gatherings. Honestly, it might just be one of the most eye-catching desserts you’ll ever make at home.
This recipe has been on my mind for quite a while. I’ve always loved the idea of creating a cheesecake with multiple layers—each one infused with a different fruity jelly flavor. Not only does it look beautiful when sliced, but it also delivers a fun mix of flavors in every bite.
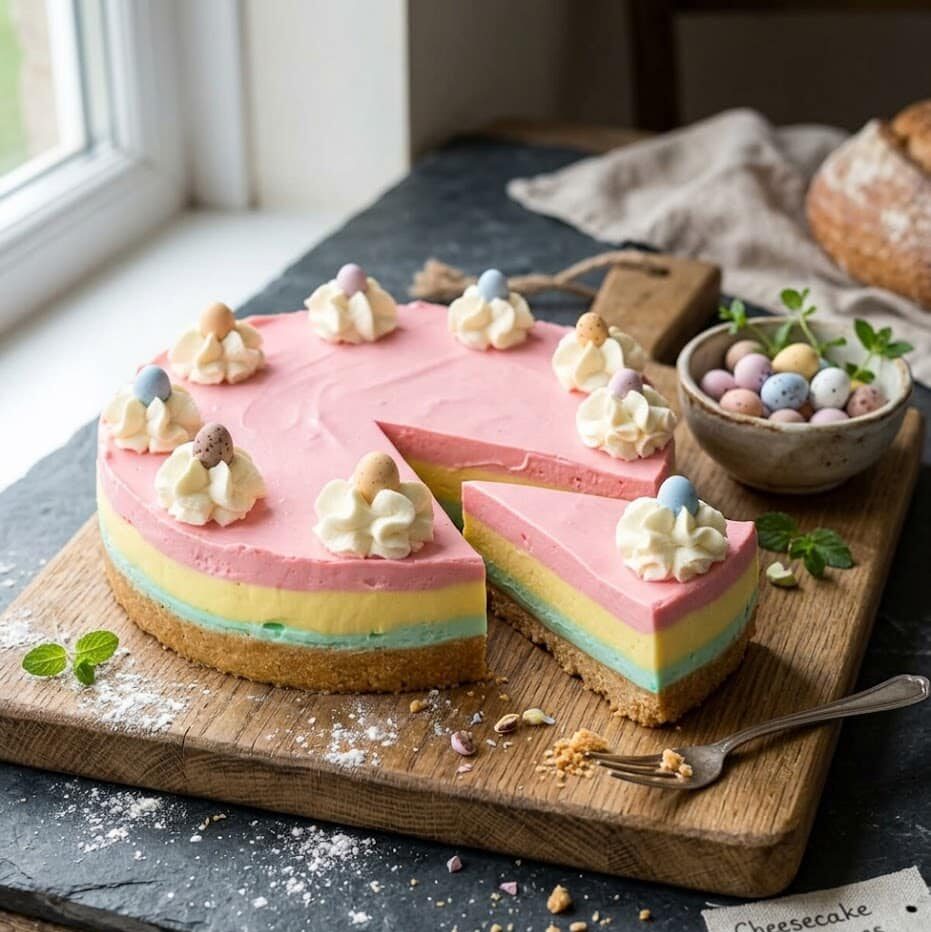
A Showstopping Layered Cheesecake
This no-bake cheesecake features three vibrant layers, each made with a different jelly flavor. For this version, I used blueberry, lemon, and raspberry, but you can absolutely customize the flavors depending on your taste or the occasion.
The result? A soft, silky cheesecake with a buttery biscuit base and three distinct fruity layers that complement each other perfectly without being overwhelming.
It’s the kind of dessert that makes people stop and say “wow” before they even take a bite.
Is It Difficult to Make?
Let’s be honest—this recipe does take a bit of time. But don’t let that scare you.
It’s not complicated at all—just a little patience is required while each layer sets before adding the next. Think of it as a relaxing, step-by-step process rather than a quick dessert.
The effort is absolutely worth it once you see those clean, colorful layers when you slice into it.
Why You’ll Love This No-Bake Layered Jelly Cheesecake
- No oven needed
- Perfect for beginners
- Visually impressive
- Customizable flavors
- Light, creamy texture with a fruity twist
Whether you’re making it for Easter or just want to impress guests, this cheesecake is a guaranteed success.
Tips for the Perfect No-Bake Layered Jelly Cheesecake
No-bake cheesecakes are generally simple, but a few key tips will help you get perfect results every time.
1. Prepare Your Pan Properly
Using a springform pan is essential. For best results:
- Flip the base upside down (this helps with easy removal later)
- Lightly grease it so the parchment paper sticks well
- Line both the base and the sides with baking paper
This small step makes a big difference when it’s time to remove the cheesecake cleanly.
2. Get the Base Just Right
The crust creates a delicious contrast to the creamy filling, so don’t skip this part.
You’ll need:
- Crushed plain biscuits (like digestive or Marie-style)
- Melted butter
- A touch of lemon zest for freshness
Press the mixture firmly into the base using the bottom of a glass or measuring cup. This ensures a compact, even layer that won’t crumble when sliced.
3. Use the Right Cream Cheese
Always use block-style cream cheese at room temperature.
Spreadable cream cheese often contains additives that can affect the texture, making your cheesecake too soft or unstable.
Let it sit out for about an hour before using—it should be soft but not melted.
4. Don’t Overmix
When beating the cream cheese:
- Mix until smooth and creamy
- Avoid overmixing, which can make it too loose
Once combined with sugar and vanilla, gently fold in the whipped cream to keep the texture light and airy.
5. Prepare the Jelly Correctly
Each jelly layer is made by dissolving jelly crystals in hot water, then letting it cool before mixing into the cheesecake filling.
Important tips:
- Stir well to fully dissolve the crystals
- Let it cool slightly before adding (not hot!)
- Taste and adjust flavor if needed
This step ensures each layer has a balanced, fruity taste.
Building the Layers
Now comes the fun part—creating those beautiful layers.
Step 1: Divide the Filling
Split your cheesecake mixture evenly into three bowls. This helps keep the layers consistent in thickness and appearance.
Step 2: First Layer (Blueberry)
Mix the cooled blueberry jelly into the first portion of the filling.
- Stir until smooth and evenly colored
- Pour over the chilled base
- Spread gently and tap the pan to remove air bubbles
Place it in the freezer for about 20 minutes, or until lightly set.
Step 3: Second Layer (Lemon)
For the lemon layer:
- Mix in the lemon jelly
- Add a few drops of yellow food coloring if needed
- Add a little lemon juice to enhance the flavor
Pour it over the first layer once it has set slightly. Spread gently and return to chill again.
Step 4: Third Layer (Raspberry)
Finally, mix the raspberry jelly into the last portion.
If needed, you can add a small amount of raspberry essence for a stronger flavor—but go slowly, as it can be quite strong.
Pour this over the lemon layer and smooth the top.
Final Chill
Once all layers are assembled:
- Cover the cheesecake lightly
- Refrigerate for at least 12 hours (overnight is best)
This step is essential for achieving clean slices and a firm texture.
Serving Ideas
Before serving, you can decorate your cheesecake with:
- Whipped cream swirls
- Mini chocolate eggs (perfect for Easter)
- Fresh berries
You can also serve it with a light fruit sauce like strawberry or passionfruit for extra flavor.
- Prepare jelly: Dissolve each flavor with hot water. Let cool.
- Make base: Mix biscuits, butter, zest. Press into pan. Chill.
- Filling: Beat cream cheese, sugar, vanilla. Fold in whipped cream.
- Divide: Split into 3 bowls.
- Layer 1: Mix blueberry jelly, spread, chill 20 min.
- Layer 2: Mix lemon jelly (+ lemon juice), add, chill.
- Layer 3: Mix raspberry jelly, spread evenly.
- Chill: Refrigerate overnight (or 12 hours).
- Serve: Decorate and slice.
Notes
- Let each layer set before adding the next
- Use block cream cheese for best texture
- Chill overnight for clean slices
- Store in fridge up to 3 days